24fps Editing in Adobe Premiere 5.x, 6.x, Pro, Pro 1.5
So, you have some progressive (FILM) footage all
in it's non-interlaced 23.976fps glory. You'll want to edit this in
Premiere and make an nice 23.976fps amv, won't you?
Well tough.
"What?!?!" I hear you say.
"Tough", I reply.
The Harsh Reality
There is no version of Adobe Premiere that can
confidently handle 23.976fps footage. Not one. Even Premiere Pro
version 1.5 which claims to have proper FILM support, is PATCHY. If you
feed it a 23.976fps file it may or may not detect it correctly
depending on how the avi header stores the frame rate. If you use
avisynth, it will detect the footage as 23.98fps in the Bin but process
it correctly as 23.976. This is great until you export sections, make
clips, reimport them and realise that Premiere Pro 1.5 has gone back to
thinking they are 23.98 again!
A solution to fix this for Premiere Pro 1.5 is
hopefully possible for avi files, but not just yet. For older versions
of Premiere you're
SOL. It can't be done... so you have to work around it.
But why do I want 23.976fps anyway?
Well if you are distributing online only, there's
nothing wrong with 24fps at all. However if you want to make an mpeg2,
you will get a much better encode if you can encode progressive
23.976fps and use the pulldown flags to make the video 29.97fps on
playback. Also, conventions often require NTSC for entrys and 24fps is
not compatible.
Two choices:
Option 1: Make your video at 24fps using
the source audio then change the video framerate aterwards. The audio
will need to be converted to 23.976fps which degrades its quality a
little.
Option 2: Make a slightly faster version
of your audio, edit at 24fps with this version of the audio in
Premiere. When it's made, change the video to 23.976fps and reattach
your original audio. This will balance everything out so you
get 23.976fps video with your original unchanged audio. This is better
quality but needs more preparation in advance and you can't change your
audio mid project.
Complicated choices. Option 2 is better quality
but much fiddlier, so unless you are confident don't use this option.
Option 1
To do this option, you need to change all your
source footage to 24fps, you need to have a 24fps timebase and edit at
24fps. Export at 24fps and export the audio separately.
Changing the framerate of your exported video
There are two ways of doing this. You can either
process the video with avisynth and use AssumeFPS(23.976) - which works very well. The other
way is to change the framerate in the avi file using a program called AVIfrate,
which comes as part of the AMVapp.
To change the framerate of an avi file, simple
load Start Menu > AMVapp > Support Tools > AVIfrate,
locate your avi file and change the value.
Changing your Audio to Match
Now that you have changed the video, you need to
change the audio otherwise the video will become more and more out of
sync as it progresses.
To change your audio, you will need BeSweet which
again is part of the AMVapp. Open up Start Menu > AMVapp >
Audio Apps > BeSweet GUI
By clicking the folder icon next to Input (top
right) you can locate your audio file. Be sure to select the wav
extension so that your audio file is detected.
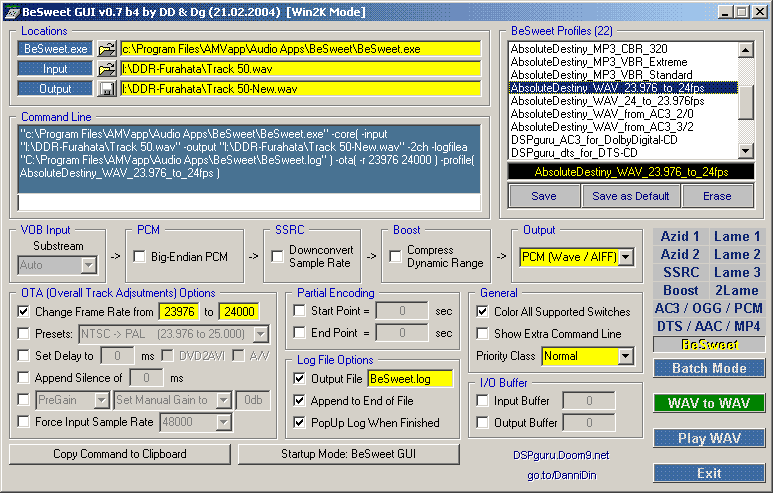
Once you have the file selected, in the Profiles
menu (top right) choose AbsoluteDestiny WAV 24 to 23.976fps and
all the required settings will be made. These profiles are available in
the AMVapp version. If you do not want to use the AMVapp you can
download the profiles here.
Click WAV to WAV to get your new audio to match
your 23.976fps video.
You can attach your video and audio using
VirtualDubMod or you can use the audio file around for use during the
audio encoding sections later on.
Option 2
First off, you've obviously read and followed the guide on IVTC'ing your footage so it's
progressive.
This option requires you to edit at 24fps but
with altered audio so that when you change your video to 23.976fps
later it will all synchronise fine.
Changing the Framerate of Your Source Before
Editing
Since you've got AVISynth files at this point
which are IVTC'd to be in 23.976fps, the first thing we do is need to
make them 24fps so that Premiere can deal with them. All you need to do
is add this line to the end of your AVISynth script:
By clicking the folder icon next to Input (top
right)
you can locate your audio file. Be sure to select the wav extension so
that your audio file is detected.
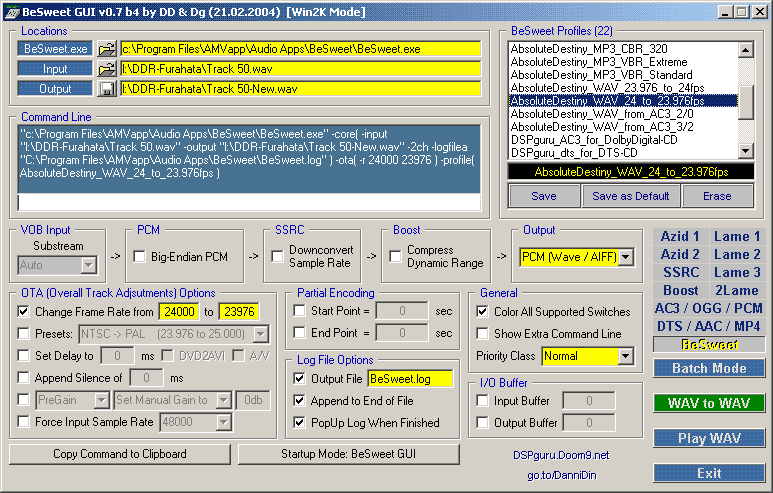
Once you have the file selected, in the Profiles menu (top right)
choose
AbsoluteDestiny WAV 23.976 to 24fps and all the required
settings will be made. These profiles are available in the AMVapp
version. If you do not want to use the AMVapp you can download the
profiles
here.
Now you can click WAV to WAV to create your new
audio file. What this will do is make your song 0.1% faster than it was
before (and, hence, a little more high pitched).
Editing with the new audio file
It is very important, when using this method,
that your video and your new audio start and end at exactly the same
point on the Premiere timeline. If you start the audio late then it
will be very difficult if not impossible to swap the audio out later.
For this reason, you may want to do bumpers separately and append them
once everything is 23.976fps and edited.
Getting
Back to 23.976fps
Once you have exported your video, you need to
change its framerate.
There are two ways of doing this. You can either
process the video with avisynth and use AssumeFPS(23.976) - which works very well. The other
way is to change the framerate in the avi file using a program called AVIfrate,
which comes as part of the AMVapp.
To change the framerate of an avi file, simple
load Start Menu > AMVapp > Support Tools > AVIfrate,
locate your avi file and change the value.
Provided that you edited with the changed audio starting at the first
frame of you video, you should be able to use the original wav file in
all processing from now on. You can mux the original audio with
VirtualDub or you can use it in the audio compression guides as
explained later.
What if I HAVE to edit 29.97fps but I want it to be
progressive?
Well, with anime and AMVs, that's not really a problem. You can easily
add AssumeFPS(29.97)
to your script and have faster playing footage to edit with. Animation
is pretty forgiving of this and you can always slow sections down in
your editing program. I have used this method in many videos (mostly
multi-editor projects that have required 29.97fps videos) and it works
fine - and in every version of premiere too.
Live action is less forgiving, however, and a speedup such as this will
often be noticable, so be warned if you get any notions about using the
same trick for live action videos.
AbsoluteDestiny and ErMaC -
September 2004