Encoding
DivX 5-Compatible video with XviD 1.0.1+
Before you
Encode
Many people think that encoding is all about encoder settings - if you
have all the right settings then you will have a perfect encode and it
couldn't get any better. This is not true. You can only have a good
encode of a source if the source is good to start with.
A good codec is only a small percent of what you need in order to
produce a good encode. The rest relies on you being able to prepare
your footage to make it easier to encode and making it look prettier
before you start losing data in the encoding process. This is the real
skill of a good encoder.
So, if you've arrived at this page without looking at the sections on
how to prepare your footage for encoding then you should stop
reading right now and go back and read those pages. They are going
to be more valuable to you than the information contained on this page
- trust me.
Before you start to try encoding your video you need to make sure you
have done the following - you can't expect to make a decent encode unless
all of these things are true:
1) The footage is NOT interlaced. looks
terrible on monitors and causes havoc for encoders. You
must remove interlacing before encoding - see this page on
deinterlacing.
2) Your footage has been cropped. Having source footage
with black borders on any side of the video is a waste of space that
could be used to encode the actual active image. These should be
trimmed no matter how small.
3) The video is resized to multiples of 16. Your video should be
resized to a resolution that fits the source aspect ratio (usually
4:3). It must be resized to multiples of 16 in order to be fully
compatible - 320x240, 512x384, 640x480 are example of 4:3 resolutions
that are multiples of 16.
4) Your video has been temporally smoothed. Pretty much
every source has some kind of noise that happens between consecutive
frames - the only time this wouldn't be true is if you have drawn the
footage cleanly yourself. Even the prettiest DVD has this noise and it
wastes a large amount of data when encoding. Temporal smoothers such as
Temporal Cleaner, Convolution3D, deen, fluxsmooth and so on all reduce
this and give you a lot more bits to play with when encoding
the
parts you really want to look good.
There are, of course, all sorts of other things you can do to make an
encode look better - there's a whole guide on that topic alone - but
the above rules are the absolute minimum. If you haven't done all of
these then you can't get the best out of your encoder.
Quick link Index:
- What is this XviD thing?
- Where to get XviD
- Getting Started
- VirtualDubMod
- XviD 1.0 Compression Options -
What's all this about?
- Setting up XviD 1.0 Encoding
Options
- Twopass Encoding
- The First Pass
- Saving the First Pass
- The Second Pass
What is this
XviD thing?
XviD is an mpeg-4 codec which is developed for educational use
by programmers in their free time.
The reason you are reading an XviD guide here instead of a DivX5 guide,
WMV9 or RealPlayer guide etc. is as follows:
1) XviD is more customisable, which allows us to choose
options better suited for amvs - this is not entirely possible with
DivX5.
2) Although RealPlayer 9 and above can give very good results, it is a
restrictive format that doesn't allow for as much compatibility as
MPEG4 variants do.
3) XviD doesn't have any spyware of any kind; DivX 5 (if you want all
the options) installs spyware unless you pay for it.
4) I've got more Xvid experience :)
The other good thing about XviD is that although you have to
download a new codec to encode your videos, people who have DivX 5 do
not need to download a new codec to see them, provided you use the
options in this guide :) Also, as it is mpeg4 compliant it can be
later muxed into a true standards compatible MPEG4 file or played back
on MPEG4 hardware players.
If you want to encode XviD avis with extra options, other
people will need either the XviD codec or FFDShow installed to watch
them.
Where to get
XviD
An installer is contained in the amvapp, but you can download
binaries from koepi's
site. In addition the gamrdev
site has even more up-to-date builds in terms of code but they are
untested.
Getting
Started
This guide is based upon the XviD 1.0.1. The version of XviD
is included in the AMVapp and can be downloaded from Koepi's Site.
Make sure you do not use the 1.0 release, as there were a few
bugs present that would affect anime encoding.
It
is possible that by the time you read this, the 1.1 branch will be
under way and betas will be released. It is likely that the newer
betas will have better quality but I cannot guarantee that the options
in this guide will work with the newer developments nor that the
encodes you make with those betas will be compliant and work in the
future. I will hopefully try and keep this guide as fresh and up to
date as possible.
Note well: Before installing a new copy of XviD you
should close down any video programs like Premiere, Virtualdub
and so on and uninstall the
old one first. This is particularly important if you have a very old
version of XviD as you can have many problems if a new version is
installed on top of the old one.
VirtualDubMod
This version of the guides advises use of VirtualDubMod rather than VirtualDub for encoding and
other such things. There are many reasons for this but suffice to say
it is more suited for the uses explained in these guides. It is very
similar to VirtualDub although you may notice very quickly that the way
audio is dealt with is very different. VirtualDubMod is
packaged with the AMVapp so you can load it up from the AMVapp menu in
your Start Menu. There is a more detailed run-down of how VirtualDubMod
works on the new AMVapp pages.
When you have VirtualDubMod open, you can now go to File
> Open Video File... to load your source footage. If you are
following these guides correctly you should have an avisynth (.avs)
file to load up which has your filtering and resizing options all ready
and waiting. Now choose Video > Compression, scroll down and select
Xvid MPEG-4 Encoder then click the button labelled "Configuration"
XviD 1.0
Compression Options - What's all this about?
If you are familiar with the old XviD encoder layout you will
notice that things look a LOT different these days. You will be greeted
with the following which will now be referred to as the main page.
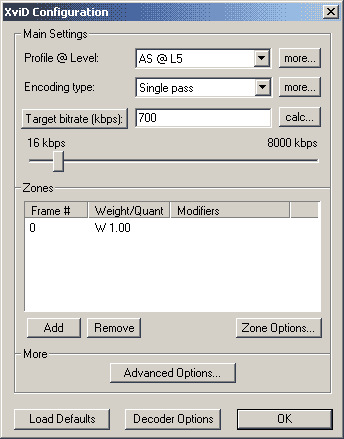 Let's look at each part individually so you can
work out what it all does and what parts you need to know about. Let's look at each part individually so you can
work out what it all does and what parts you need to know about.
Profile @ Level: This pulldown menu allows you
to select MPEG-4 encoding levels. These levels are often specified by
decoder devices and define what sort of mpeg-4 content they can play.
AS means Advanced Simple and L5 is level 5. AS @ L5 is the
setting we will use in this guide. You can choose "unrestricted
profile" but your encodes are not guaranteed to be MPEG-4 compatible.
The more... button will take us to the settings related to
Quantizers and so on - we will come back to this later.
Encoding Type: Like before, you can encode
Single Pass, Twopass (First Pass), Twopass (Second Pass). There is no
distinction between internal and external twopass operations now. Of
course, you will want to select Twopass (1st Pass). The more... button
next to this menu will contain different options depending on the type
of encoding selected.
Again, we will look at these later.
Target Bitrate: This area allows you to specify
what bitrate you would like to aim for. "Target bitrate (kps)" is
actually a button and if clicked it will switch to its alternative
mode. In Single Pass this can be changed to Target Quantizer. In
Twopass (First Pass) this button and the window will be greyed out (as
there is no such thing as Target Bitrate for a 1st pass). In
Twopass (Second Pass) it will allow us to specify a Target Bitrate or
a Target Size. The calc... button will open up the
new XviD bitrate calculator, which we will use in this guide later on.
Zones: This is probably the area which makes the
least sense to new users of XviD 1.0 but luckily the majority of you
won't need to use it anyway. This area allows you to specify areas of
your video to encode with different properties. The main option you can
set is "weight" (think of it as a
measure of importance in how good a section of the video needs to
look).
So, if you were
compressing a movie, you could set the credits to have a really low
"weight" so they don't take up too much space and are encoded at low
quality. You can have many zones - they start at the frame specified
and end at either the end of the file or the start of the next zone,
whichever is first. By
default a single zone is set starting at frame 0 with a Weight of 1. If
you set a new zone with a Weight of 0.5 it would be, essentially, half
the average quality, 'W 2' would be double and so on. You can set
fixed quantizers too - they appear listed as Q 1 etc instead of W 1.
Zones
are only required if you want to make sure a certain section of the amv
is encoded in a certain way (making one part smaller or more detailed
as required). Zones are clever but only useful in certain situations -
you can read about all the zone options later in the guide.
Advanced Options... This is fairly self
explanatory. The options themselves will be discussed later.
Load Defaults: Resets all settings to their default
configuration. This is usually done on install these days but should be
checked after each new install just in case settings become changed
between versions.
Decoder Options: allows you to specify how the XviD
decoder will playback XviD files... this does not change any of the
actual encoding process, it is just for the player on your machine.
Setting up
XviD 1.0.1 Encoding Options
With all these menus and sub-menus it is easy to be confused with XviD
1.0+ but luckily many of these options will only need to be set once
and
the rest you will probably never use. In this guide, the settings will
be chosen specifically for encoding AMVs. Live Action footage and full
length features may benefit from different settings but the ones in
this guide are reasonably universal - however,
when testing new options starting with the defaults is always a good
option.
The XviD encode this guide will recommend is going to be compatible
with XviD, Divx 5 and ffdshow decoders on windows and mplayer 1.0rc3 and above on GNU/Linux (and
miscellaneous other UNIX) systems. For hardware players
your mileage will vary due to the benefits and limitations of various
chipsets. You
can probably find good info on the 'net as to which options work with
your player.
Notes about
Twopass Encoding
XviD allows you to encode in either one or two pass mode. Two pass mode
has a huge advantage over one pass mode in terms of quality as it is
able to distribute the bitrate sensibly from scene to scene to make
sure that everything looks as good as it can at that bitrate. It can
also help make sure your file doesn't get too big.
In two pass mode, you encode your
video and whilst you encode it the codec records all sorts of data
about how much information is contained in each part of the video. When
it's done you select the "second pass" option in the codec
configuration page and encode the
same source file again, just like before but with 2nd pass options
selected. The difference
is that this time the codec knows how easy or hard each scene is to
encode so tries its best to keep the quality high by distributing the
bits depending on what a scene needs. Twopass is NOT about compressing
a file once and then compressing the compressed file again - that is a
really bad thing to do. It's just a method that processes the same
source twice and the second time around the codec knows how to compress
it well.
The First
Pass
The first pass is used by a codec to find out how many bits are needed
in each
scene of your video. This procedure (the way we do it in this guide)
will produce a file that is at the maximum quality the codec can do
with these settings and this source footage. Most of the time, this
file is a little too big to distribute so we then do a second pass and
tell the codec to aim for a smaller filesize.
Let's start from the main page as shown in the picture above except
this time Twopass (1st Pass) will be selected.
Now choose the more... button that is next to Profile @ Level.
This
opens the main options area of XviD 1.0 which contains options that
determine the compatibility of the file you are encoding by enabling or
disabling advanced encoding options. These options are true for
both One and Twopass encoding but here we are using Twopass. Note that
for ease of reference, the images show all the preferred options
recommended by the guide.
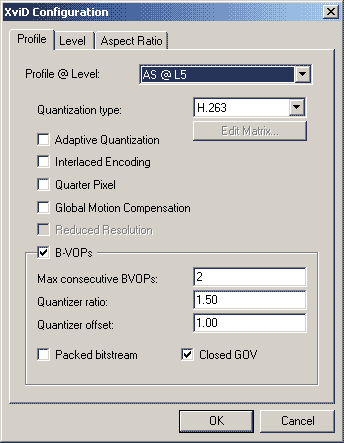
As before the Profile @ Level
selected is AS @ L5 which is what we want. Different levels would
change what options are available to you.
Underneath this we have the Quantization Type. After a
vast amount of testing I have found that H.263 gives the best results
for anime encoding pretty much every time. Under some circumstances a
custom mpeg quantizer
matrix can be used to good effect (such as the hvs-best matrix) but on
the whole H.263 is the most reliable quality-wise for anime.
Adaptive Quantization is the new name for what was
once known as Lumi Masking. It compresses very dark and very light
areas more because in theory your eyes are less sensitive to these, but
you may find it makes things look blockier. It doesn't offer a large
advantage - it's compatible so you can use it if you like but I don't
really recommend it.
Interlaced Encoding is an option you will never
need to use.
If you have followed these guides then you should not have an
interlaced video to compress, nor should you be compressing an
interlaced video if you are going to distribute it on the Internet.
This option encodes the footage in fields instead of frames to retain
any interlacing. It does not remove interlacing, it is designed to keep
it. This function is not always compatible with non-xvid players and is
not recommended.
Quarter Pixel is a neat feature that isn't
always helpful. It's designed to improve the accuracy of motion
detection (it can calculate motion to 1/4 of a pixel in theoretical
movement accuracy instead of just 1/2 like normal) and this can improve
compression in some sources. However, storing information at this
greater accuracy takes up more space straight away so you have a Catch
22 situation
because it will only save bits if there is a lot of quarter pixel
movement in the
source. You cannot tell beforehand, it's all in the maths and so it
will not help every encode which means you may end up with a bigger
file with no benefit. It also takes much more processing power to
decode (up to 60% more sometimes) so because of these issues it is not
recommended for amv files for mass distribution.
Global Motion Compensation
takes the idea of calculating motion and applying it to the whole image
- this can save bits overall and is a good thing. The only 'problem' is
that the XviD encoder is very sophisticated and uses 3 warp points to
calculate this whereas the DivX 5 encoder only uses 1 (at the moment).
Unfortunately, decoders aren't entirely up to speed with this either so
it is common for them to not know how to properly handle GMC with 3
warp points. For compatibility reasons this option is not, at the
moment, recommended.
B-VOPs are B-Frames, a feature that DivX 5
touted but in their early versions were pretty ugly. XviD's new
B-Frames are pretty
nice and very useful as I shall explain. You may recall from the theory
guides that there are Intra-frames (I-Frames), Predicate Frames
(P Frames) and Bi-directially Interpolated Frames (B-Frames). The old
XviD used to only use I and P frames. B-Frames are used to save even
more space by referring to data both in the last frame and one that is
coming later in a sequence. They are incredibly useful in saving space
as they can be compressed more while the loss in quality is less than
or equal to the loss in bits which means that overall you have more
bits to use which improves quality overall and everyone's a winner. You
don't have to use B-Frames (particularly if you aren't
interested in
saving space and just want the best quality) but they are good for
getting the best quality in high compression. It is recommended to
keep this option checked unless size is really not a problem for your
encoding.
Max consecutive BVOPs specifies the maximum
amount of these B-Frames that can appear in a row. DivX 5 only encodes
1
B-Frame in a row. XviD's default is 2 which is the highest you should
go (as each extra B-Frame increases the processing power needed to
decode). However, there is a compatibility concern. DivX5 can decode 2
B-Frames in a row but not when Packed bitstream is
selected. This guide recommends keeping 2 B-Frames and
deselecting Packed bitstream but if you want to keep things really
compatible with DivX 5 and some hardware players then you may want to
reduce the max BVOPs to 1.
Quantizer ratio defines how much higher the
B-Frame quantizers will be than the P-frames. Higher quantizers are
lower quality but the B-Frame savings make them worthwhile. The default
setting of 1.50 is fine and recommended.
Quantizer offset: adds this value to the B-Frame
quantizer number calculation. Keep this at the default of 1.00.
Packed bitstream is a function established by
DivX 5.1 which in theory allows better decoding and reduces bad audio
sync. This is true until you start using more than 1 B-Frame. If you
use 2 B-Frames this should be deselected in order to ensure that people
will be able to watch this encode correctly using the DivX 5 decoder.
Closed GOV makes sure that a P-Frame always
appears before a new I-Frame. You don't have to understand why except
to know that this is a good thing. Always keep this selected.
These are the main options that you will need to set when
making anime encodes and will work perfectly fine for live action
encodes too. These options will also make sure that your encode can be
easily played by a variety of decoders including DivX 5 and ffdshow.
When you are confident that all of these options are set
correctly, you may click OK to return to the main encoder options page.
You may be wondering what the other tabs were for. The Level
tab gives you some stats on the MPEG-4 profile and level you
have selected - these are theoretical values and won't have any effect
on your encode. The Aspect Ratio tab is,
presently, only useful if you are going to use a special container for
the video (such as MPEG-4 or Matroska) as it allows you to set an
option to tell a decoder to resize to a particular aspect ratio on
decoding. This is designed to encode anamorphic footage in mpeg-4
containers. Your video should not use this option as it will be already
resized to square pixels which is the most compatible method for
decoding as the avi container is not really used for specifying aspect
ratio and many players will ignore this setting.
Now that you are back on the main page, you should make sure
that Twopass - 1st pass is selected in the Encoding Type
pulldown menu. Doing this will hide the bitrate window as the First
Pass of an encode does not attempt to reach a particular bitrate as it
is used for calculating quality distribution in your video.
Click the more... button that is next to Encoding Type and
you will be greeted with a simple menu with a file location window and
two options.
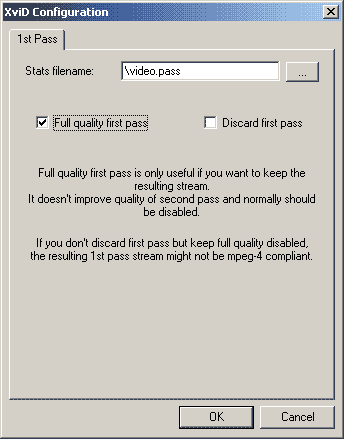 Stats filename: The statistics that are
recorded during your first pass are kept in a log file. You can, if you
like, specify a particular file to save this to. By default it is saved
in the directory of the file you are encoding, so
if you encode something to C:\encode\amv.avi then the stats file will
be C:\encode\video.pass - you don't need to change this option. Stats filename: The statistics that are
recorded during your first pass are kept in a log file. You can, if you
like, specify a particular file to save this to. By default it is saved
in the directory of the file you are encoding, so
if you encode something to C:\encode\amv.avi then the stats file will
be C:\encode\video.pass - you don't need to change this option.
Full Quality First Pass: This is an option that almost wasn't
included until myself and several others asked for it to be put in.
By default, XviD does a quick 1st pass that doesn't really create a
very stable encode - it's just done to make the calculations for the
second pass. You can (and should) select that the first pass creates a
file that is the full quality of the encoding settings. The reason is
twofold: 1) The first pass may be small enough to distribute and so you
know you have the best quality encode you can get with these options
and this source. 2) It's useful to know how big the maximum quality is
to help you calculate how small you could make your file without losing
too much quality. You should select this option - it will be a little
slower but it's much more useful. However, if you know that the first
pass is definitely going to be too big, disabling full quality first
pass will be much faster.
Discard First Pass: This sets XviD so that it
doesn't really save any video data to the file during first pass.
Again, we actually want to keep the
first pass in case it is good enough. Uncheck this option.
You can now press OK to return to the main page.
We are almost done with our settings (I know there's a lot of
them but you get used to it after an encode or two). You won't need to
specify Zones - if you think you do then you probably already know what
they are used for. 99% of the time you won't need them from amv
encoding. The only thing I will mention is that in the Zone options you
can set a Zone to use a Chroma Optimizer which is
fabled to help blocking in dark areas and on things like walls in
anime. You should probably only select this if you are trying to get
rid of a problem you have noticed with an encode you made already.
The last settings we need to configure before starting our
First Pass are the Advanced Settings. Click the Advanced
Settings box underneath the Zone window and you will see something like
this:
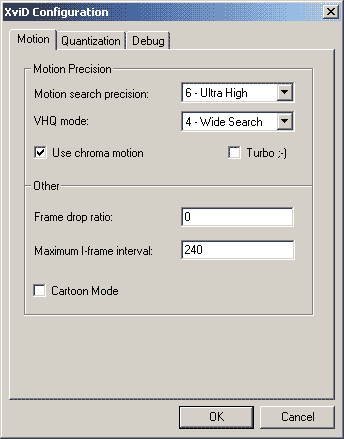 The
first tab is the Motion tab which allows us to alter how xvid
calculated things that are moving in the video. The
first tab is the Motion tab which allows us to alter how xvid
calculated things that are moving in the video.
Motion Search Precision: This tells XviD how
hard it should look to see if parts of the video are moving around. You
will want to keep this set at 6 for maximum quality.
VHQ mode: This is a new addition to the code in
the last year that goes into even greater detail when analysing motion.
It's stable now and higher values will increase quality at the cost of
speed. You should set this to 4 - Wide Search.
Use Chroma Motion: This is yet another motion
searching option that will also take into account the chroma
information when deciding how things have moved. This is another
recommended setting.
Turbo ;-) This ditches certain mathematical
functions to speed up the encode. Not advised, we are in no hurry.
Frame Drop Ratio: You do not want to change
this. Unless you really really know why you should, you don't want to
change this value. Keep it at 0
Maximum I-Frame Interval: Like previous
versions, this sets how far apart keyframes are allowed to be. This
should be set to around ten times your video's FPS, hence the 240 here.
Cartoon Mode: Now you are probably thinking that
this is a great option for anime encoding. Well actually, it's not
really. It's designed for sources made with large blocks of colour and
simple lines. The reality is that most anime have all sorts of details
in their backgrounds and so on that they don't gain much benefit from
this (in fact it can make them look worse). This is for simpsons-style
animation not bebop-style animation. Hence, this option is NOT
recommended so keep it unchecked. The way it works, for those
interested, is twofold. Firstly, it ignores more changes in parts of
the picture that are still as they are more likely to be noise and
secondly it drops data in low quantization areas which gets rid
of noise but also fine details. The latter is not a good thing to use
on most anime and the former can easily be achieved by using a temporal
smoother to pre-filter your source.
Once you have set up the options as show above click along to
the next tab, Quantization.
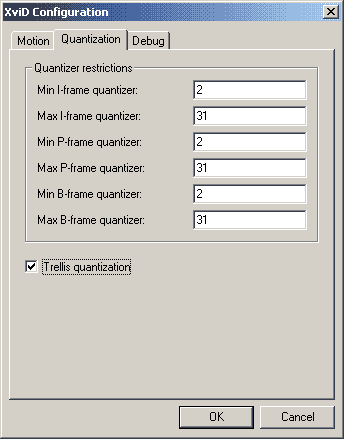
This menu allows you to select what range of Quantizers are to be used
in your XviD encodes. The default settings have all Minimum quantizers
set to 1 and all maximum set to 31 - this is the full range. A
Quantizer used by a frame will usually dictate the quality, with 1
being best and 31 being worst.
The old XviD used to have the default minimum set at 2 and
this is the option I suggest. Although quantizer 1 is the mathematical
highest quality, it is not vastly better quality *visually* than
quantizer 2... but it is MUCH bigger in bytes.
As XviD is used mostly for Twopass encoding, quantizer 1 was
added to defaults to allow people to fill up all the bits when fitting
in a certain size such as a CD. For amvs this isn't really required as
every bit saved by using quantizer 2 instead of 1 is precious -
especially if you host your own videos.
These settings will also mean that our full quality first pass
will be constant quantizer 2 just like the old XviD.
Trellis quantization uses a neat bit of
mathematics that simplifies certain parts of the Discrete Cosine
Transform and gives bits to others etc etc... in practice this settings
pretty much always increases quality, so it's worth selecting. This
function was broken but is fixed in 1.0.1
The final tab in these Advanced Settings is the Debug
tab which looks like this:
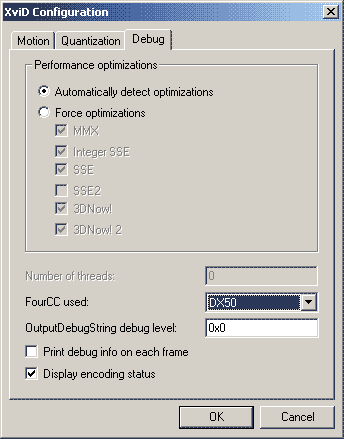
This tab shows you a few things, most of which you don't need.
Firstly there is the CPU optimizations which are automatically
detected. The ones here tell smart folk that I am using an Athlon XP.
You can choose Force optimizations if you really want but ones that
your chipset can't do wil only cause crashes and removing optimizations
is only useful if you are getting some odd instability.
Number of threads is for you lucky multi-processor people.
FourCC used: This selects what Four Character
Code is put on the avi. This code tells whatever program you use what
codec it needs to play it. The default is XVID but as our encode is
DIVX5 compatible you can select DX50 so it works on machines that do
not have an XVID decoder installed. DIVX works too but people with DivX
4 installed will probably have trouble playing the files.
OutputDebugString debug level: Do you know what
this means? If you do I have no more to tell you, if you don't then
don't worry about it. Leave it as it is.
Print debug info on each frame: This will dump
all sorts of programming info on your video, which you probably don't
want.
Display encoding status: XviD has a new encoder
window that gives all sorts of clever info about what has been encoded
so far. If you don't like it, you can turn it off here.
All done. Press OK to go back to the main page.
Before finalising everything and saving the first pass, let me
explain what all the Zone options do and why you'd use them
just in case you want to give these a try. On the main page you can see
that there is a Zone starting at frame 0 that has a "weight" of 1. What
you can do is add a new zone or edit an existing one. Click add
to try adding a new zone then click zone options...
to bring up this menu:
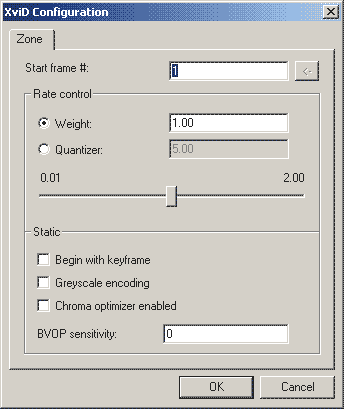 Start
Frame # sets the first frame of the zone. This might be the
start of a bumper that you want to have a certain quality or the start
of an important hard to compress scene that you want to make constant
quantizer 2. There are all sorts of uses for zones as you will see in
the descriptions of these options. Start
Frame # sets the first frame of the zone. This might be the
start of a bumper that you want to have a certain quality or the start
of an important hard to compress scene that you want to make constant
quantizer 2. There are all sorts of uses for zones as you will see in
the descriptions of these options.
Weight: As mentioned earlier this is a
number that alters the quality relative to the overall quality of the
encode - so 0.5 would be half the usual bits and 2 would be double.
Quantizer: If you don't want to set the quality
by weight you can set it by quantizer. 2 is typically "best" although 1
is better but much larger. Lower values are smaller and worse quality
so you may want to use those in scenes or areas which are bitrate hogs
but you don't really need them to look good - such as scenes of TV
static and so on.
Begin with keyframe: Forces a keyframe at the
Zone start frame. This is a useful way to make sure that a keyframe is
added in certain places - something we had to edit the stats file to
achieve in the past.
Greyscale encoding: tells XviD to ignore all colour
information in this scene. This is usually added so people can compress
things like end credits even more by removing their colour. You won't
need it for greyscale scenes in an amv as XviD can encode these
perfectly well without this option - it's just there to remove colour
for you.
Chroma optimizer enabled: This is designed to
reduce that stepping effect you often get on gradients. This option is
not default because it usually increases the size of a video and make
it mathematically noisier - however if you see this stepping effect
then this option is what you need to eliminate it. It should only be
used on a scene by scene basis.
BVOP Sensitivity: This allows you to force an
area to have more or less B-Frames. Positive values increase and
negative values decrease the chance of B-Frames. It's a sensitive
option so 5 will have a decent boosting effect, for example. You wont
want to go higher than 20 really and anything lower than -30 won't be
noticed and you are not likely to have B-Frames in that section with a
value so low. Using a zone to remove B-Frames can be a good thing,
especially if you have one or two scenes which contains the B-Frame
artefact problem that I will describe at the end of the First Pass.
Remember when setting zones that a zone will either go to the
end of the video or until the next zone, so if you want to change
something in the middle of your video then you should add two zones
with the second being where the video returns to normal. Once you are
done setting up zones (if you are setting up any at all) you are
ready to go.
That's all the settings you need for your First Pass. Now it's
time to make the encode.
Saving the
First Pass
Once you have all of your XviD encoder settings ready, it's time to
save the first pass.
This part of the guide is going to focus purely on the video part of
your encode - you can attach the audio later by following the audio
guide. When you've got the hang of the software it's easy to do these
at
the same time.
With your file loaded into VirtualDubMod, go to the Video menu and
choose fast recompress. This will mean that you will not be
able to use any internal VirtualDub filters but all of your filtering
should be already done in avisynth. Fast recompress will make sure that
no unnecessary colour conversions are made before encoding.
Now you can go to the File Menu and choose 'Save As...'
You will get something like this:
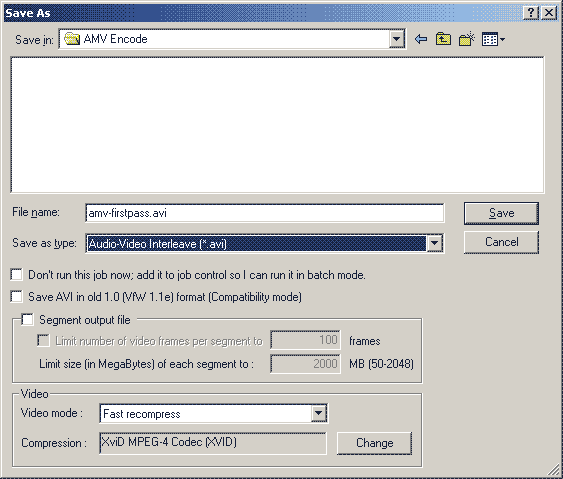 Now, it is
possible in VirtualDubMod to save your encode in different containers.
You can save it in an avi container, an ogg media container or a
Matroska container. Now, it is
possible in VirtualDubMod to save your encode in different containers.
You can save it in an avi container, an ogg media container or a
Matroska container.
Although the other two have all sorts of cool things about them, we
will be saving our video in the good old fashioned AVI container. It's
the one most compatible with what people have installed.
You can check out this page on the alternative containers, however, as
you might decide that one is just the thing for you.
You will also notice that you can choose Fast Recompress here in case
you forgot to earlier :)
Enter the title of your video and keep it memorable so you know it's
the first pass encode, then click Save.
As you encode you will get two status windows pop up:

This is the VirtualDubMod status window that you should be familiar
with if you've ever used VirtualDubMod. Not a great encoding speed but
I had other programs doing stuff :P
The thing to keep an eye out for here is the projected video size - if
by the end of the video this starts to go much higher than 120mb then
you have a hard to compress source and it may not look that great after
the second pass. If you haven't filtered it much then you probably
should.
Also, you may not be encoding audio like I am here (actually it's not
being compressed at all, but like I care - it was just for a test
picture).
If you need to hurry the encode along then change Processing thread
priority to Highest - but don't expect to do much else. If you need to
get on with other things without them lagging, setting it to idle will
only use spare cpu cycles.
The next window is the XviD status window in all it's glory:
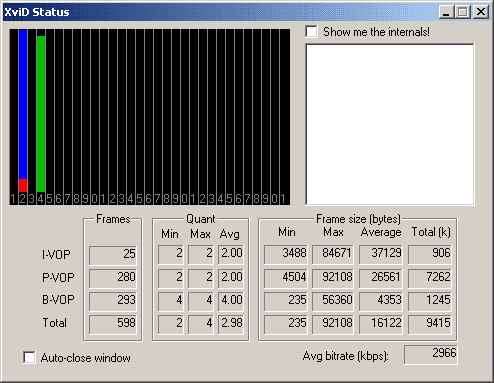 This window
contains all sorts of lovely facts and figures. As this is a first pass
everything is fairly predictable: I-frames are at quantizer 2,
B-Frames are at quantizer 4 and so on. This window
contains all sorts of lovely facts and figures. As this is a first pass
everything is fairly predictable: I-frames are at quantizer 2,
B-Frames are at quantizer 4 and so on.
Coloured bars show how much of each quantizer is being used - as you
can see all 25 keyframes (red) are quantizer 2 as are all the 280
P-Frames (blue) and the 598 B-Frames (green) are quantizer 4.
This will become much more interesting in the second pass when you can
see the distribution of the quantizers during the encode.
Again, you have the average bitrate and also the total size in kbytes
(in the bottom right box - 9415 on this image). This number is useful
to know as it will tell you how big the video stream is once the encode
is finished. This can help you decide on a final target size.
Checking out the First Pass Encode
At the end of the encode, you should load the avi into your favourite
media player and see how it looks. If you've followed the guides
diligently then everything should look great.
Other playback problems may occur if you don't have an up-to-date DivX
decoder installed or your decoding settings are in some way messed up.
This is usually not a problem with the encode.
OK, if you are sure it looks good then we can continue. What was the
final size of the video? If the size is small enough for you to go
ahead and distribute (40mb is the average size for a 3 or 4 min simple
amv) then your encode is complete!
However, if your first pass encode is on the big side (between 70 and
120mb) then
you will need to do a second pass to reach a desired filesize. If your
first pass is bigger than 120mb you should consider reducing the frame
size of your video or doing heavier filtering. The
question is, what should that filesize be?
Of course it is up to you, but if you want something to still look
pretty decent then you should aim to have your final encode be around
70% of the first pass size. This is not always possible as some videos
are hard to encode but don't be a quality whore about it; really you
should never go above 20mb for each minute of video as that's getting
excessive. You can also go much much smaller than 70% first pass if you
like,
but if you start getting major blocking then reducing the resolution
and doing better filtering may well be a better option than just
reducing the target size. Encoding well requires a lot of trail and
error.
The Second
Pass
If you have decided you need to do a second pass, go back to
VirtualDubMod and open up the Video > Compressor... XviD
Configuration Settings again. Do not... I repeat - Do Not load your
first pass encode into VirtualDubMod - we are compressing the original
source for a second time, not recompressing the one we just made.
On the XviD main page you can now select Encoder Type as Twopass
(2nd Pass) and you will see the Target Bitrate box and window
appear (probably at the default of 700). If you click Target Bitrate,
you will see that it transforms into Target Size. It is size, not
bitrate, that we are going to specify to make sure our final encode
comes out small enough.
Calculating the Second Pass Bitrate
So, have you decided the size for your video? If you are
using the 70% rule then all you have to do is take the number of the
final video frame size from the XviD status window (as described
earlier) and multiply by 0.7 and put this into the Target Filesize box
on the XviD main page.
If, on the other hand, you want to reach a particular size (such as
small enough to fit on your web host) or you want to make it even
smaller then you are best using the XviD bitrate calculator, which has
now appeared as a calc... button next to the Target Filesize
box. Click on it to get this following:
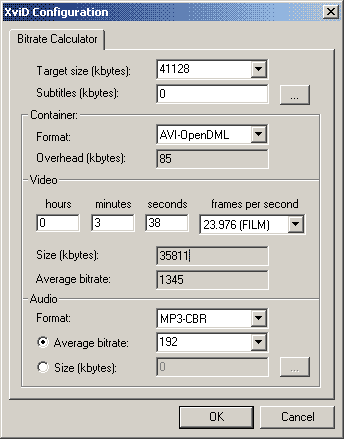 In the Target
size (kbytes) box, I have put a target of 40mb (to work it out in
kbytes multiply by 1028). In the Target
size (kbytes) box, I have put a target of 40mb (to work it out in
kbytes multiply by 1028).
There are no subtitles being muxed in this video, so
that stays at 0.
Format will be AVI-OpenDML. There are options for
other containers which have different header sizes, so select them if
you need to.
In the Video section, put the total minutes and seconds
of your video in the boxes and choose the framerate. If you are
encoding a 24fps source you will have to choose 23.976 as there is no
24fps option. It's close enough.
Finally in the Audio section you need to choose your
audio options. If you follow the guide this will be MP3-CBR
with a bitrate of 192 but if you choose to encode your mp3 using an
external variable bitrate method you should choose MP3-VBR and then
load the mp3 into the calculator by pressing the "..." button next to
Size (kbytes). This will work out the total size of your audio stream.
Once all of this info is entered you can copy and past the Size
(kbytes) in the grey box in the middle. This is your Target Filesize
for your second pass.
Final Second Pass Settings
Go back to the main page and paste your Target Filesize into the window.
You are almost ready to encode your second pass - there's just one last
set of options to choose. If you click the more... button next
to Twopass (2nd Pass) you will find a menu that is different from the
one in the 1st pass - it looks something like this:
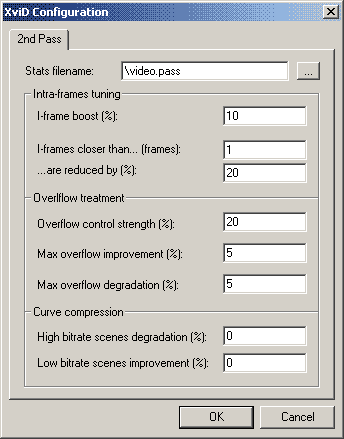 Again we have a Stats
Filename box, in case you want to specify a specific file. This
should be the same as the setting in 1st pass. Again we have a Stats
Filename box, in case you want to specify a specific file. This
should be the same as the setting in 1st pass.
Intra-frames tuning is a section that you probably
won't ever need to change. I-frame boost shows
how much more bits are given to keyframes. The default is 10% and this
is fine for your needs.
The I-frames closer than part is to change how things
such as consecutive or nearly consecutive keyframes are handled.
Default settings has the bits used by a consecutive keyframe reduced by
20% - there's little reason to change these options.
Overflow treatment on the other hand, will have a
noticeable effect on your encode. The default settings of these things
has changed dramatically over the last year and even as I write the
doom9 XviD guide is out of date for these settings. The default
settings for control strength, improvement and degradation are all 5%.
These are good settings when encoding full length movies. The Overflow
control strength dictates how agressively the codec should force scenes
to have higher or lower bitrates - with higher values getting more
accurate file size but not as steady quantizers.
Although the default is 5, amvs (being usually only 4 mins long) need a
slightly more aggressive algorithm in order to have enough overflow
control to make a difference. After
much testing, it was found that for amvs it is better to have an Overflow
Control Strength of 20%. Keeping the default of
5 is perfectly fine too, it's just that 20 came up best in my tests.
Max overflow improvement and Max overflow
degradation tell the codec how much to add or take away if an
area is over or undersized respectively. It's incredibly rare that you
will want to change these settings - in tests having these much higher
made a really uneven bitrate distribution and ended up with most the
video looking awful.
Curve compression will adjust the default bitrate
curve that XviD will decide as the best to encode the source in its
second pass. It is unlikely that you will want to change these as the
XviD curve compression has really been optimised to the max. If,
however,
you think that the curve compression is giving too many bits to either
high or low bitrate scenes then you can reduce that by setting either
the High bitrate degradation or the Low bitrate degradation.
Once these options are set and finalised you are ready to do your
second encode. Chose 'Save As...' just as before and encode your new
2nd pass encode. You should see an XviD window that will have the blue
and green bars spread across a greater range of quantizers.
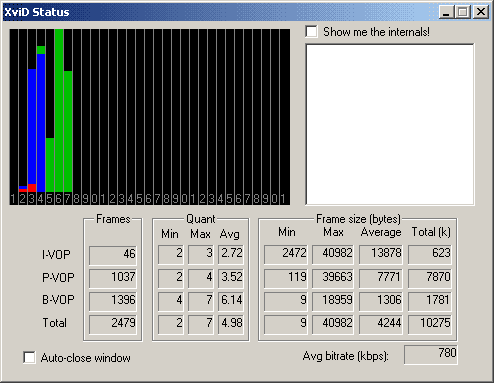 For a
good
looking encode you'd expect the blue to be massing mostly between
quantizers 2 and 4 and the green to be mostly between 4 and 8. A wide
range of quantizers is fine but large amounts of frames with low
quantizer will always look awful. The closer the average P-Frame
quantizer is to 2 and the average B-Frame quantizer is to 4 the better. For a
good
looking encode you'd expect the blue to be massing mostly between
quantizers 2 and 4 and the green to be mostly between 4 and 8. A wide
range of quantizers is fine but large amounts of frames with low
quantizer will always look awful. The closer the average P-Frame
quantizer is to 2 and the average B-Frame quantizer is to 4 the better.
When it's finished, it should look great. If you realise that you are
really compressing too much for your desired filesize then you either
have to increase it, reduce the resolution of your encode or do some
more smoothing on your source file.
I hope this compression guide has been useful. If you haven any
questions that aren't covered here, please ask in the Video Software
Forum.
AbsoluteDestiny - May 2004
|