Method 3: Faster Editing with DVD footage.
It's possible that you may find method 2 to be too slow on
your machine. To overcome this, I developed a solution which allows
perfect quality but with a faster editing experience.
However, this procedure has only been tested on Premiere
5.x and 6.x. I have been told that it is impossible to use this
method with Premiere Pro at this time - if anyone knows differently
then let me know. This method may work for other editing programs but I
have not tested this so you should experiment.
Basically, you take every AVS file you want to use and make an
ugly-but-quick AVI export of each one. It is frame for frame identical
to the avs except the avi is much lower quality. Then you should edit
in Premiere with these low quality versions and when you are done you
can get Premiere to switch back to the avs files which means in
the end you have DVD quality footage but have used quick footage for
easy editing.
The Method
You will already have avisynth files ready for all the footage
you want to use if you have followed the guide. As you are creating
fast quality versions of your avs files for editing then you wont have
to worry too much about the slowdown caused by IVTC filters, so feel
free to include these in your avs scripts if you wish.
Now you need to get a codec that is good for editing.
This means NO divx, NO mpeg-1, NO cinepak etc.
The codec I recommend is the PICVideo
MJPEG codec as all the frames are keyframes, the compression is ok
and it's VERY FAST. Now, this codec is shareware which means you can
use it but it will put a logo on all of your files - but this is ok as
we aren't going to use these files for our export. However, I do
recommend purchasing a registry key for this codec to remove the logo
as it is a great fast codec.
A free alternative to this codec would be the mjpeg support in
FFDShow, which comes with the amvapp. I haven't tested it for
stability, however, so be sure to test things first.
Open up VirtualDubMod - this is the program we
will use for creating the avi files. In the Video >
Compression... menu choose PICVideo MJPEG (there might be
some other PICvideo codecs installed, but you don't need those). Now
click "Configuration".
Here you can set a quality for your file - the lower the
number the worse the quality but the faster the editing
- and it is speed we want. Make a couple of little clips and see how
low a number you'd want to go - 5 to 10 are ok and will be really
quick. Less than 5 and it starts getting too ugly to use, really. I
usually use a setting of 8 for making fast clips.
Now choose Fast Recompress from the Video menu and
save to an AVI that is named similar to your avs file (so you know
which AVI goes with which AVS). Your frame rate has to be the same
as your avs file. I wouldn't change the
resolution either as this will effect how things like motion settings
will work when you edit.
Save your avi versions. If you need to make some space, then
you can delete your vob files after you have made the avi files
but only do this if you can make them again exactly the way you did
before as we need them for our export. I personally like to keep
the vob files around as you can then access your AVS files to get high
quality stills, previews and things like that.
In any case, switching quickly back to the avs versions
regularly throughout your project is recommended just so you can make
sure that it is working ok in avisynth land :)
Note 1: If you are using Windows 9x or have a FAT32
hard drive, you cannot create avi files that are larger than 2
gigabytes. When making an mjpeg version of the movie metropolis at
quality 5, the file ended up at just over 2 gigabytes. Now, as you have
to have avi files that are identical to your avisynth files for this to
work, it is advisable in this situation for you to create DGIndex
projects based on a few vob files each time rather than the whole disk
as one project file. This will mean that your low quality mjpeg
versions will be small enough to work under Win98 or a FAT32 hard drive.
Note 2: Your low quality files will have slightly
different colour shades in comparison to the original so if you are
doing any colour keying effects and so on then you will have to switch
to the avs version until you have them set up. You will also have to do
that if you need to get stills from the source as well.
Switching Back to the DVD quality AVS Files in Premiere
You should test this out at the very start to
make sure this method works for you. Premiere has a facility called
Replace Clips, but I find that it sometimes crashes annoyingly. It
might work for you, but it is buggy for me. However, the method that
works best for me is as follows: to test things out, get an avi clip
and put a small section on the timeline. If you are doing a video with
lots of avs files, load all of the avi files just so you can test if
premiere will load all the avs equivalents.
To do the switch from avi files to avs files you must:
1) Save your project
2) Save another copy using "Save As..." - you wont need the
preview files.
3) Close Premiere
4) Go to the folder where you have all your avi clips and
make a new subfolder called 'hidden'. Move all your avi clips into
there. Alternatively you can rename your folder - anything to make
Premiere 'lose' your avi files. Do not delete them :)
5) Open up the duplicate copy of your project. It
will then stop when it can't find an avi file. When it asks you to
locate the avi file, instead point to the original avs version. This
should load up your project with nice high quality DVD footage.
Make sure you test this method with sample clips and a sample
export before starting your project to see if you are
comfortable with it. It should work fine though - I've used the method
a lot.
Once you have seen that the test works, you should KEEP
THE AVS FILES EXACTLY AS THEY ARE. Do not change your avs files
around - ESPECIALLY once you've started editing as they need to be
identical (frame wise) to your avi versions for this to work.
Quality, Stability and the Premiere AVS GUI
When dealing with avs files in premiere (during your export)
there are some quality and stability issues to take into account.
The new Premiere plugin, developed by fellow amv-ers, contains
a GUI which can change the quality of the footage you import into
Premiere and it can also set up memory options to make AVS useage more
stable.
When Premiere asks for a frame which is a different size than
your source (preview window, timeline or exporting at a different size)
the avs import plugin has to resize it. To do this there are 4
different resizers that you can choose in the GUI:
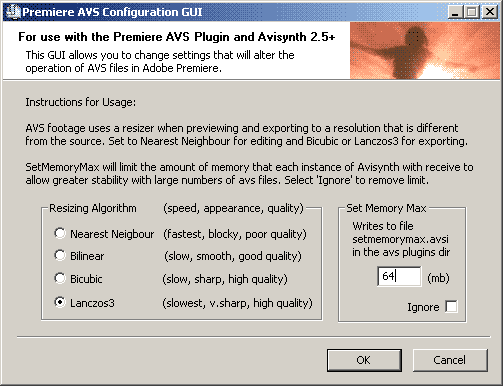
As you can tell by the descriptions,
low-quality resizers are fast and high quality resizers are slow. For
your export you should choose Lanczos3 as it has (arguably) the highest
quality of all the options. This will only be used if you are exporting
a video with a frame size that is not the same as your source. This
should be rarely or never as it is always recommended to export at the
same frame size as your source.
The right hand section of the GUI changes the Set Memory Max preferences
in avisynth. Avisynth is not usually designed to process multiple avs
scripts at once and as a result the memory can get used up really fast
when processing multiple scripts. This can lead to avisynth crashing
halfway through a render. To avoid this you can set the maximum memory
allowed by each script. This option currently only works with Avisynth
2.5+ (which comes with the amvapp). The default setting is 64mb but if
you are usuing lots of scripts you may want to reduce this to avoid
memory crashes. It's a tricky thing to set, however, as some scripts
which have a lot of processing may need a lot of memory and could crash
if you set it too low - don't go below 16mb unless you really have to.
Errors, bugs, limitations and other things to avoid
Using avisynth scripts in Premiere can be a delicate matter.
There are a number of things you should do be aware of when importing
avs scripts into Premiere:
1) Check that the script works in VirtualDubMod. If
you open a faulty script in Premiere you will just get a small 10
second clip containing an error message.
2) Make sure your avs script is creating an RGB32 output
By adding ConvertToRGB32() to the end of your script, you can make sure
that the footage is in the correct format for processing in Premiere.
Also, 24bit RGB support in the import plugin is sometimes problematic
and will sometimes give you a clip in pure black rather than the
footage you want. Converting to RGB32 will avoid this.
3) Don't slow down clips too much. If you slow down
clips in Premiere to very very slow speeds
(like <10%) then it might crash avisynth when you try to
export or reload
your project. Do not do this. Either make a still and use that or if it
crashes when applying lots of filters, try and pre-render the section
with a lossless codec.
4) Do not change your script whilst Premiere is open.
It probably won't crash but if Premiere is expecting a 1000 frame file
and you change something and give it a 30 frame file then any clips
that no longer exist in the new avs file will be converted to 1 frame
empty clips. Also, if you change the frame rate Premiere will have to
interpolate the cuts and this can be really inaccurate leaving you with
clips from all the wrong parts of your source footage.
5) Look out for avisynth crashes. If avisynth crashes
it produces a short error clip instead of the footage. This is bad
because it means the frames that were once there are no longer there.
Premiere will sometimes, seeing that the frames are not there, convert
your timeline edits to 1 frame completely destroying your project. The
trick to avoid this is to NOT SAVE if you see this happen. Close down
premiere, check your avisynth scripts to see if they are working, check
your memory max settings and try the project again. If it's been saved
with 1 frame cuts then you will have to go back to an older save file
to restore your project. This is why setting up a Project Archive is
important - you can see how to do that in the section on setting up
your Premiere Project.
If you keep these things in mind you will discover that using
avs footage is a mostly painless procedure. If you have any
difficulties you should see the testing phase earlier in the guide for
details of possible avisynth problems. If you have any concerns or
questions, ask in the Video Software forum.
Now that you're done, you should go to the section on setting up your video project.
AbsoluteDestiny - May 2004
|