Analysing Your DVD FootageThis is a new section of the guide which, instead of jumping you straight into editing your video or making clips to edit with, will have a look at the footage you have so that you are aware of some of properties of it so you know what to do with it later. Inexperienced editors will often just edit with footage and then when they have finished realised they have a major quality issue that is hard to fix once everything is edited together. That's learning the hard way - hopefully this page will help you avoid problems like that. For ease of reference, this page covers the following topics:
Just like the end of the last page, you should have an avisynth script loaded into VirtualDubMod and you should be able to see your dvd footage. Let's have a closer look at it... Is it Interlaced?You probably know this already because DGIndex generally tells you if it is or not (Frame Type: Interlaced or Progressive). It is very important to look closely at the frame type when DGIndex previews and when it creates your project file as this will tell you a great deal about the way the footage is encoded. You will need this information to understand a lot of the things below as we will be comparing this information to what you can see in VirtualDubMod.If you have completely progressive footage (as seen in DGIndex) that after using Force FILM shows no interlacing at all (see the picture below for an example of interlacing) then you can be happy. If you have interlacing of any kind you will need to read through this page carefully so you can work out what to do with it. Also, be aware that some openings and closings can have different results, so try using F6 from a point in the middle of an episode to find out the frame type in the middle of an episode. When it comes to mpeg2 footage the Frame Type in DGIndex tells you whether the frame has been stored one frame at a time (Progressive encoding) or one field at a time (Interlaced encoding). However, that's just how the frame is being stored - when you look at it what you see may differ from the Frame Type. You always need to check the Frame Type(s) reported by DGIndex when you did your F5 preview against what you can see by looking at the footage and seeing if it is actually interlaced or not. To check for interlacing in VirtualDubMod, scan through a part of the footage with movement and if you see any frames that look like two different frames weaved together with lots of horizontal lines then you have interlacing. It will probably look something like this:  Of course this sometimes confirms what the frame type was in DGIndex but some times does not, so let's compare the frame type and what you can see. There are 5 possible situations: 1) Definitely Progressive FILM. It says it's FILM (or at least 97% FILM) and when decoded with Force FILM you can't see any interlacing. Great, you have progressive 23.976fps footage. (It's possible with some movies that the main feature is progressive but studio bumpers are not - provided you don't need the studio bumpers this shouldn't be a problem). 2) Definitely interlaced. DGIndex tells you it has entirely interlace-encoded frames and sure enough they do contain interlacing and contain those tell-tale 'horizontal lines' in motion areas (see image above). You should use interlaced=true when doing colorspace conversions such as ConvertToRGB32(interlaced=true). 3) Progressive footage encoded as 'interlaced'. This is where you have footage which doesn't look like it has any interlacing at all but DGIndex has told you that every frame was encoded using Interlaced encoding. This means that the footage was encoded one field at a time even though both fields are part of the same frame. This isn't a problem, really - you can still encode and edit it progressively. This often happens with PAL encodes of movies. The only thing you need to be careful about is whether the chroma channel is sampled correctly when doing any colourspace conversions. I'll show you how below and, thankfully, it's rare for this to be necessary. 4) Interlaced footage encoded as progressive!! This is where DGIndex tells you that the footage is entirely progressive but the footage isn't FILM at all - it's interlaced... you try using Force FILM but there's interlacing everywhere and the original FILM frames are not restored. This is bad as it probably means that whoever encoded the footage messed up their encoder settings. As you may know, DVD footage is stored in YV12 which takes one chroma (colourness) sample in a square of 4 pixels. If you have interlaced footage you need to encode one field at a time to avoid having a chroma channel which is the average of two different images because of the interlacing. When someone encodes an interlaced source with progressive encoding it really messes up the chroma of a frame as it is averaged between two different images and is a really bad thing. Unfortunately there's not much you can do to fix this - examples of this include the Manga Video release of Wings of Honneamise which is one of the worst anime dvd encodes ever. Thankfully examples of this are rare these days. 5) Switching between interlaced and progressive! If in DGIndex a source is switching between interlaced and progressive but is also being reported as completely FILM then don't worry - it's progressively encoded and Force FILM will restore the original frames. However, if it is switching and it's being reported as mostly NTSC then you have a hybrid dvd (just like the SuperGALS disc I'm using below) and this will need to be handled in a different way, as I will describe later. Hybrid sources have two forms, one is where you have mostly FILM and only some parts interlaced and the other where only some parts will be FILM. These will be discussed in more detail later. Remember that some sources that only have a very small about of interlaced footage (such as FILM 98%) can often have Force FILM used. Often but not always - so make sure you double check for interlaced frames in virtualdub when using this option. I have yet to see a hybrid PAL dvd but I suppose it could happen. As you have read, Situation 3 and Situation 5 both require special handling, so let's looks at those. If you have situation 3 where the footage looks progressive in VirtualDubMod (no interlacing) but DGIndex said it was all interlaced then it is probably encoded one field at a time even though the fields are both from the same image. This isn't much of a problem but if you change the colourspace such as ConvertToRGB32() you might get something called bad chroma upsampling, which looks like this: (look closely at the edges)  The bad chroma (blockiness) has occurred
because the frame
was thought to be progressive when it was actually encoded as
interlaced frames (or vice versa) and so the colour samples are decoded
incorrectly. Some DVD players suffer from this
problem too. If you do see this problem it is most common when you do a
colourspace
change you will want to put "interlaced=true" inside the parenthesis
such as:
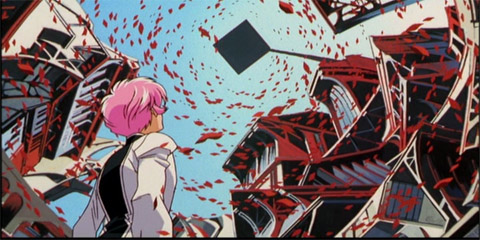
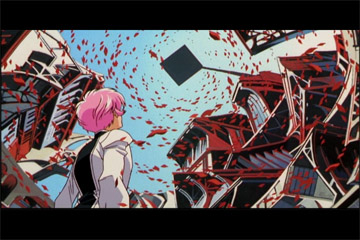
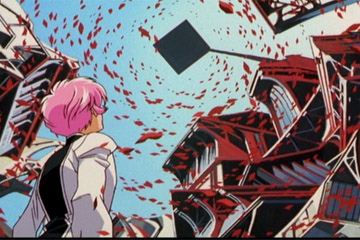
ConvertToRGB32("Interlaced=true") [Note that SuperGals does not have this, I purposefully upsampled the chroma incorrectly to demonstrate - SuperGALS is an example of situation 5] If you have situation 5 is an interesting situation that will probably also affect any deinterlacing or IVTC you do later too. Essentially what you will get when decoding this is a senario where some frames are interlaced (and encoded one field at a time) and some are progressive (encoded one frame at a time). If you are deinterlacing or using IVTC then this will not be a problem as all the footage will become progressive in the end. If you keep your footage interlaced, however, this can cause problems because once you've passed the footage to avisynth it no longer knows if a frame is encoded as interlaced or as progressive. This means that if you then convert the footage to YUY2 or RGB, some of the frames will have bad chroma just like the image above. The way to avoid this is to ask dedecode to give you correctly upsampled YUY2 footage by using the upconv=true parameter in your MPEG2Source command as follows: MPEG2Source("C:/yourfolder/yourprojectfile.d2v",cpu=4,upconv=true)This is the way you should decode footage if you intend to edit it interlaced. Checking the Field OrderIf you have interlacing you will want to find out what field order it is. The first thing you might ask is "What is Field order?" This is talked about in the Theory Guides but it's worth summarising a little. Interlaced video has two fields - the odd lines (1,3,5 etc.) and the even lines (2,4,6 etc.). When an interlaced source is created, the fields are made in order and then interleaved (woven together to make one frame). However, sometimes the odd lines are the first field in the sequence and on other occasions the even lines are the first field. So when it's played back you need to know which lines get shown first on a tv otherwise the motion will jitter. The amv contest at AX2002 discovered this when they tried to convert all their MPEG2 entries (top field first) straight into DV (bottom field first). This was bad - so was the way they tried to fix it later >< So, what you need to do to pre-empt this problem is work out the field order.Now you might be thinking "How the hell do I do that?" - well luckily I've included a little helper function in the AMVapp to help you - add this command to the end of your avisynth script in VirtualDubMod and press F5: CheckFieldOrder()It won't show up in green as it's a custom function. It should work, though, and you should see something like this: 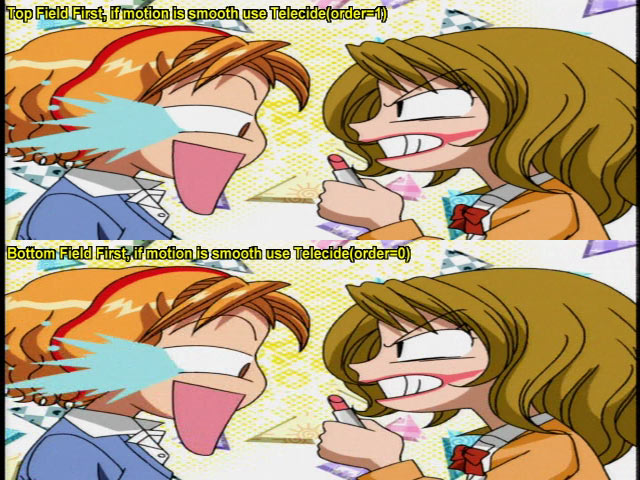 When you get this image, you may want to use
the right arrow cursor key to scroll through the footage frame by
frame. One of the images will have ordinary looking motion and the
other one will jerk back and forth in a really obvious manner (note
that both will have a little vertical jitter, but that's natural). The
smooth one is the correct field order - Top Field First or Bottom Field
First (some editing programs refer to this as Upper first or Lower
first but it's the same idea).
This is important to know this because: 1) If you IVTC with Decomb 5 you will need to specify a field order. This is what you need the Telecide(order=1) thing for.If for any reason you need to swap the Field Order of a source, you can by using the ADSwapFieldOrder() command. This is a very simple command that removes the top line and makes a duplicate of the bottom line in order to shift everything up one. There are also avisynth plugins that can do this too. Remember that progressive footage does not have a field order - or rather it can be displayed as either top first or bottom first and it will never matter. Thankfully, because of this property of progressive footage, it is easy to mix progressive footage into a video containing interlaced footage with a field order. However, when editing only progressive footage you should disable field processing in your editing application (in Premiere and similar programs, set rendering to "no fields") otherwise you may find your effects and fades will be processed interlaced. Interlacing Methods: Telecine, Pure, Hybrid, Blended and Half-BlendedOK, so you now know if you have interlacing and also know what the field order is. The next thing you need to know is how this source has been interlaced so you can decide how to remove it if you want to. This is useful to know even if you want to edit interlaced footage as there are some interlacing issues which can play havoc with quality.We aren't going to talk about how to remove the interlacing yet - this is just a description of the different types so you can know what kind of deinterlacing to do later. Read through them all and see which description best fits the interlacing in the source you have. Pure Interlacing Pure interlacing can occur in both PAL and NTSC sources. This process involves taking full advantage of the 50 or 60 individual fields a second that are used in PAL and NTSC video to get the smoothest looking video possible when shown on a TV. If an anime is produced in pure NTSC then it is likely to be really difficult to cleanly remove the interlacing as there are fewer full frames to restore as there are lots of fields which have a unique image. Many modern shows are completely digitally animated and so they sometimes take advantage of this feature. PAL also uses this feature a lot as the NTSC fields are sometimes decimated to PAL numbers and reweaved into a pure interlaced PAL stream. This makes original frames much harder to find. When faced with a pure interlaced source it is sometimes not worth looking for the original frames (which is what you do with Inverse Telecine filters like decomb) sometimes it's better to just completely deinterlace them. Telecine and Pulldown Material If you have footage that was cell animated (the old fashioned way, not computer aided) or you have a source that was made for the cinema then there's a good chance that the footage was produced at 24fps and has gone through a simple Telecine (3:2 Pulldown) process like the one described earlier in the theory guides. If you are really lucky, this process was clean and has no pure interlaced footage at all. This is a common process used to convert FILM to 29.97fps NTSC. PAL footage can also use pulldown (2:2 pulldown) where either both fields will be from the same image to make one regular frame or there will be an offset so that the fields go ab bc cd de where a b c and d are different images. This is easily correctable using an Avisynth plugin called decomb but frankly this method is pretty rare on PAL anime dvds (unfortunately) Removing Telecine interlacing is called Inverse Telecine (IVTC) and is pretty easy to do in AviSynth with the Decomb plugin (as contained in the AMVapp install) which has two functions (Telecide and Decimate) that when used in succession will IVTC your source. This will be explained in detail later. Remember, this process will only work perfectly if you have a neat Telecined source. This is actually pretty rare these days as most sources are Hybrids. Hybrid Sources These are sources that have a mixture of interlacing patterns. Some anime have a digitally edited opening sequence which is pure interlaced and then use a regular Telecine pattern during the episode itself. X TV and Azumanga Daioh both use this particular method. Some shows just use pure interlacing on scenes where they have added something digitally, like some CG or a title etc.. These are Hybrid sources and are the most common type for anime TV shows these days. You see, although they could make completely fluid animation at 60 fields per second it's a lot of effort. Even with computer animation the animators are too lazy to go into that much effort. Pans and other parts of animation that can be automatically created with computers are more likely to use all the fields for ultimate smoothness but there are many sections that will still be only 24, 12 or even 8 frames a second. Those parts can generally have their original frames restored. Success in cleanly removing the interlacing in hybrid shows will depend largely on the amount of pure interlacing you have. If you don't have much, and most of the footage is a regular old-fashioned telecine then you can IVTC and your footage will be mostly pretty smooth. If you have mostly pure interlaced material you can either try full deinterlacing (smoother motion, not always as good picture quality) or you can try using the avisynth decomb filter but smoothness of motion may be a problem in parts where pure interlacing has been used to make the motion smooth (digital pans etc.). Full Field Blended Sources These are the scourge of PAL anime DVDs. Admittedly it is difficult, in many cases, to return to the original progressive FILM source of a show to produce a PAL version like they do with regular movies. With movies, the original 24fps FILM is found, sped up, the audio processed to match and a progressive 25fps source produced. However, many anime shows were never designed for FILM (see Hybrid and Pure Interlaced) and others just don't have FILM prints around anymore. Unfortunately when converting to PAL they have to make a 25fps output and they have to do this without making the footage all jerky. This generaly means they don't go around removing frames to make it 25fps. Instead, many production companies take the NTSC source and blend fields together in a pattern so that the effective fps is reduced from 29.97 to 25. This is very quick and convenient for the production studios but intensely irritating for an amv creator wanting a nice clean source to deal with. This is especially annoying when there is a perfectly good progressive master around and they have just not used it. You can look at the individual fields of your source in Avisynth by using the command SeparateFields() - if you have a full field blended source it will look something like this field from the Dutch rental version of Spirited Away, which is a blended field decimation of the Japanese release: 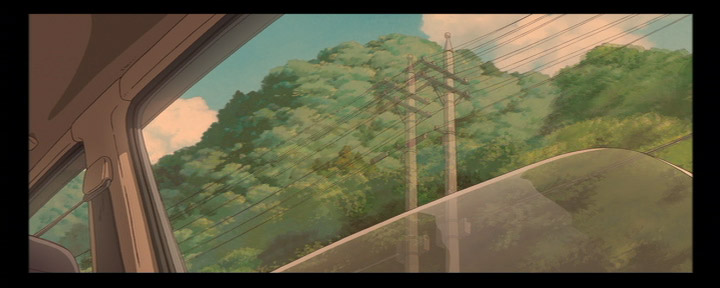 This is just one of the fields, not the whole frame. The whole frame together looks even worse, especially when you have two fields that are blended in succession from three or four different source fields. What irritates me most about this image is that I have the Japanese release and know that it is progressive and can use Force FILM on it. This means that I could have easily converted 24fps to 25fps, processed the audio to match and made a better PAL dvd than this Dutch production company... and these people get paid to do this. Cheapskates :P This blending decimation causes many problems for interlace removal. If you deinterlace this footage, you will end up with blended frames which both look ugly and are hard to compress. This can be very annoying for an editor using PAL sources as the majority of them use this technique. This is one of the reasons that despite living in the UK I only ever purchase NTSC anime sources from the USA, Japan, Hong Kong and Korea. NTSC sources have their problems too, but at least *most* of the problems of NTSC can be solved. Restoring the original frames when you have a blended source is very difficult and although attempts have been made to try and correct this kind of source, nobody has yet come up with a completely successful way of doing so. There have been some custom filters that can help, however, and investigations into this problem can be found in the following threads on Doom9.org: http://forum.doom9.org/showthread.php?s=&threadid=66093You may want to start by trying unblend which is contained in the AMVapp and are documented in the Avisynth Filters/Documentation folder. It is sometimes possible for NTSC footage to have full-field blended footage too, Sometimes this is produced when making a Telecine - being used as padding between regular frames. Luckily IVTC in decomb is pretty good at eliminating these provided all the original frames are there and the blends are just duplicates of frames that are also shown unblended. However, if there is an image which only exists as part of a blended frame then, like the PAL source, a deblending method would need to be used to try and restore the footage. You can try IVTC with decomb's filters on this sort of footage but you may either have blended frames or jerky motion depending on the Decimation process you choose. Partial Field Blended Source Just when you thought that full field blended sources were the worst you could get, along comes something that takes it to the extreme. You see, when converting FILM sources to NTSC a studio would have to use a Telecine process and some Telecine processes are good and some are bad. The good ones are clean, tidy and can be IVTCed - the original frames can be constructed by sticking fields back together and everyone is happy. However, there are nasty ways of doing Telecine. One is the full field blending technique described at the end of the last section, which is bad enough but then there are two which are even worse than full field blending: One Field, Two Halves of Two Images: The FILM footage is projected onto a screen and then sampled (a process which captures the scanlines in order) by another camera at 59.94 fields per second. This Telecines the material to the full 29.97 frames per second. This is ok except that sometimes when a field is being sampled the original projected frame changs from one image to the next halfway through sampling the field.! THe camera sampling this then ends up with a field where the top half of is from one image and the bottom half is from the next! The Avisynth filter PeculiarBlend() was written to remove this but to be honest it's not very common in anime sources... a more prevalent method is this... Temporal Scanline Blending: The FILM is converted to NTSC using a telecine device that samples each new field by scanning down the image (if you imagine the light of a photocopier moving across a piece of paper you get an approximate idea of what happens even though I am simplifying). However, as the image being sampled changes, this causes the field being sampled to blend into the next image - this grows more and more as the sampling continues until finally the image has completely changed to the next one. This is the nastiest of the nasty Telecine methods and can be seen in every Gainax production from Otaku no Video to Kare Kano and in many more late 80s to late 90s anime. It's the reason Eva Renewal had to be made. What you get is fields that looks like this: Field 1: 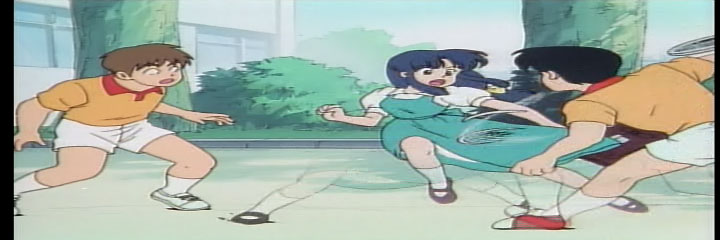 Field 2: 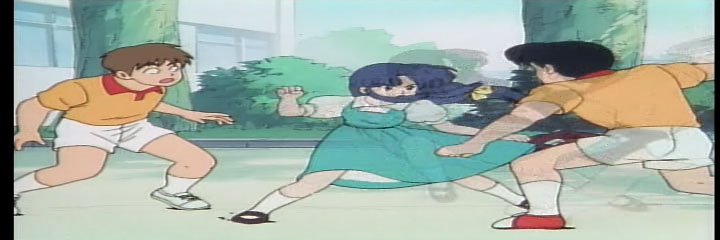 U-G-L-Y. If you look at field 1 you will notice that the blending of the two images only begins in the bottom half of the field and by the time you get to the bottom you are more in the second image than the first (see the guys foot on the right). This is the telecine device blending the scanlines more and more with time until they are in the next image and through to the next image then the next as the image is scanned. This stuff is nigh impossible to recover at the moment. There are no tools available at our level which can deal with field blending like this, the best you can do is try IVTC and hope to god you don't get too many blends and that the motion smoothness isn't totally ruined. When making my Gunbuster video I had two IVTC patterns, one without blends that was jerky in panning shots and one with blends that was smooth in panning shots and I had to use the different sources for different parts of the video depending on the scene. It's nasty stuff - especially in pans where you can end up with an IVTC process giving you a scene with horizontal motion with the top half moving in one frame and the bottom half catching it up in the next frame. Evil. There's only one thing worse than this kind of blended field Telecine - PAL anime which has converted this blended field Telecine to PAL by blending the fields even more! I haven't seen the PAL Evangelion print but from what I've heard it sounds like a mess. OK, hopefully from these descriptions you will have a decent idea of the different interlacing methods and which is more likely to be used on your source. When I describe the different settings for interlacing removal you should keep these types in mind. The next section is a property of your source with is really easy to work out but a little complicated to explain to please be patient when reading this next section. Aspect Ratios - PAR and DARDISCLAIMER: The information that follows does not use the ITU-R BT.601 standards to define aspect ratios because it is that little bit too complicated to explain and frankly aspect ratios are confusing enough as it is. If you actually know what this standard is then you probably already know yourself how to deal with aspect ratios correctly. If you don't know what it is then either don't worry about it or read this page for more info. If you really really want to be completely accurate then ask me about it or post on the Video Help forums and it can be explained but for the most part it's not a major loss to ignore this standard. Aspect ratios are one of the more confusing things about video. They rarely make as much sense as they probably should. Close investigation into aspect ratios will just get you more confused than you were to start off with, so I'm going to try and keep it simple whilst keeping it accurate in a relativistic sort of way.... I've no idea if this is possible but here goes. There are two main ways of describing aspect ratio - Pixel Aspect Ratio (PAR) and Display Aspect Ratio (DAR). Pixel Aspect Ratio A pixel is a pixel, it is a small block of colour information. However, some playback devices have different shaped pixels than others. Monitors have square pixels and hence everything that is designed for display on a monitor should have a PAR of 1. TVs however have 'rectangular pixels' which have a different PAR depending on the format (NTSC or PAL). Full screen NTSC dvd footage is usually 720x480 and fullscreen PAL dvd footage is usually 720x576. This footage is supposed be shown on a 4:3 TV... but these resolutions aren't 4:3 mathematically, so what's going on? The reason for this (I'm simplifying here) is due to the fact that TVs have rectangular pixels and when you show the above resolutions resolutions on a TV they will look 4:3. In practical terms it means that when you look at dvd resolution images (720x480, 720x576) on a PC monitor in programs like VirtualDubMod they do not have the correct pixel aspect ratio so they look a tiny bit squished/stretched in comparison to the way they look on a TV. This is normal. Some programs will correct this when they are displaying the footage by resizing it so it looks right but if you are viewing it with a "Square Pixels" option then it will look slightly wrong. The good thing is that it doesn't really matter until you display your final product as to what PAR something has. You have a video of a certain resolution to edit with and no matter what PAR you display it in you still have that many pixels. NTSC footage technically has a PAR of 0.911 and PAL has a PAR of 1.094 but we are going to work from the following principle - on a PC monitor, NTSC dvds need resizing to 640x480 to be 4:3 and PAL DVDs need resizing to 768x576. This is a simplified version of the truth but it suits us well enough. [You may notice that NTSC is downsized and PAL is upsized - this is purely and simply to keep the vertical resolution the same in case someone uses these values on an interlaced source] One thing you do need to consider is when you make your own graphics and put them in a video, these graphics will probably be designed for a square pixel display (i.e. a monitor) and when you put them into your 720x480 or 720x576 video they will look all 'squishy' on a TV because it has a different PAR. The easy way to get around this is to make your graphics larger and resize down to have the same 'squishyness' as the footage you are using. For NTSC you can make graphics at 720x540 and then resize them to 720x480 and they will look just like your dvd footage. For PAL you can make graphics at 768x576 and resize to 720x576 for the same effect. Starting with the larger images and sizing down is the best way to keep quality. You can, if you really like, resize your dvd footage so that it has a square PAR and then edit but we'll worry about things like that later when it comes to actually preparing the footage. Display Aspect Ratio In mpeg video this is often stored as a flag that basically says "this is the aspect ratio that you should display me at". There are two possible Display Aspect Ratios (DARs) on a DVD - 4:3 and 16:9. TV shows will generally be 4:3 and movies will generally be 16:9 unless they are pan&scan or letterbox (see below). Movies with a 16:9 DAR are what we refer to as Anamorphic (or sometimes listed as "optimised for widescreen TV" etc). We will look at those in a moment. Both PAR and DAR need to be considered when producing video so that it is displayed correctly when it is played. The Internet (i.e. Monitors) - If you are making a video for people to watch on the Internet and you are using a 4:3 tv series like Trigun then you will need to produce video with a PAR of 1:1 and a DAR of 4:3. Usually this means resizing to resolutions like 640x480 or 512x384 when making your distribution version. TVs - When making a video for display on a TV you will want to use a full screen resolution with the appropriate PAR (720x480 or 720x576) and a 4:3 DAR for regular TVs or a 16:9 DAR for widescreen TVs (if you actually have 16:9 content). Regular TVs are generally able to convert 16:9 DAR to 4:3 by letterboxing the image (some DVD players can do this too). Essentially what this means for you is that you should probably leave the source the way it is and if you have any original content you are adding make sure it has the same PAR as your source footage. Conventions - If you are making a video for a convention then it will probably have to be a video with a full screen resolution (720x480 for NTSC or 720x576 for PAL with the usual PAR for this format) with a 4:3 DAR. Conventions usually can't use 16:9 DAR footage so to avoid any 16:9 content being displayed incorrectly you need to letterbox the image to make a 4:3 DAR. I will explain how this works in the Anamorphic source section below. When it comes to editing, you need be aware of the PAR and DAR when you are mixing footage together. There are all sorts of things ways you can approach this which I will talk about in the sections on preparing your footage for editing. Anamorphic Widescreen VideoSome video sources are lucky enough to be encoded as Anamorphic Widescreen. This is a very good thing in terms of picture quality. So, what is anamorphic? Let me demonstrate with an NTSC dvd source: Revolutionary Girl
Utena the Movie (aka Adolescence of Utena) The resolution of an NTSC dvd is 720x480 and is generally
designed for 4:3 footage. However, in order to maximise the amount of
pixels being used, a widescreen movie is sometimes scaled to fit that
resolution like this (images are 1/2 size):
This means that the video is using all of the available quality of the DVD and it also means that widescreen TVs only have to stretch the image horizontally - which is also good for quality. The display aspect ratio for the image is actually 16:9 so the image, when shown corrected, will look something like this:
That image was made by stretching the image horizontally, just like a widescreen TV would do. If you were watching it on a 4:3 display, you might be able to set it so it adds letterboxing to display the 16:9 image like this:
Sometimes sources will be already letterboxed.
Those have a 4:3 DAR and the footage itself has copious black borders
on the top and bottom just like the image above. This is a waste of
good resolution. However, it is a useful technique when producing
footage for devices (and anime conventions) that cannot display or
compensate for 16:9 DAR. Another way of dealing with a widescreen source and keeping a 4:3 DAR is to do something called Pan and Scan which will extract a 4:3 image from the source by cropping the edges like this:
You can see the amount that has been removed from
the image by comparing it with the stretched widescreen image above.
The amount of footage lost is even worse when you have big budget
Hollywood movies that actually have an aspect ratio of 2.35:1 (compared
to 16:9 which is only 1.778:1). On DVDs movies with an aspect ratio
like 2.35:1 are usually presented anamorphically with a 16:9 DAR but
still need some letterboxing because they are not 16:9. The principle
exactly is the same as letterboxing 16:9 footage in a 4:3 DAR source
and it all comes out right in the end. Anamorphic sources may be great for quality but
they become really confusing when you start thinking about both PAR and
DAR. DAR is easy - they are supposed to be displayed at a 16:9
resolution. PAR is more complicated - the usual Pixel Aspect Ratio is
something that will make it look correct when displayed on a 4:3 TV...
but anamorphic footage isn't supposed to be displayed on a 4:3 TV so
what's the PAR for that? To get our heads around this, it's easiest to think of what a
widescreen TV would do with this anamorphic 720x480 image. What
widescreen TVs do
is resize the image horizontally to 960x480 and which then looks
perfectly 16:9. Of course, 960x480 isn't a 16:9 resolution but 720x480
isn't a 4:3 one either - it's those rectangular pixels again. The main problem with editing anamorphic footage is the same
as with 4:3 footage - getting graphics to have the same 'squishyness'. If you are editing NTSC anamorphic 720x480 footage then you
should make graphics at 848x480 and resize to 720x480. If you are
editing PAL anamorphic 720x576 footage at then you should make
graphics at 1024x576 and resize to 720x576. Of course, there are other ways of dealing with this sort of
source, particularly if you are editing something which mixes 4:3
footage and 16:9, but we will discuss those options later on when it
comes to preparing the footage for editing. For now be content that you
have worked your way through most of the difficult notions of what DVD
footage is all about you are ready to decide how you are going to edit
this footage:
|