Here we have all kinds of options for popular media formats. However,
there aren't many options which are really useful for amv making.
The DV preferences should be chosen if you are capturing and editing
DV. That much is self explanatory and everything should be a piece of
cake to setup - that's the good thing about a fixed format like DV,
there's not many options. Use a default and edit. You may need to
choose DV options specific to your hardware, but you should have
detailed instructions for that anyway.
If, however, you are using avi files (or avisynth files made into avi
files via makeAVIS) you will want to set up a custom project to make
sure all the settings are exactly the way you want them.
Thankfully, MSP7 is pretty flexible about project settings and most
things, if not all things, can be changed later without a massive
impact on the project. Frame rate and things like that, however, must
be set correctly form the word go otherwise you'll have problems with
edits not being in sync if you 'fix' it later.
So, if you have used the guide so far to create your footage then you
will want to
Create... a new project using the Create button.
When you do, you'll see something like this:
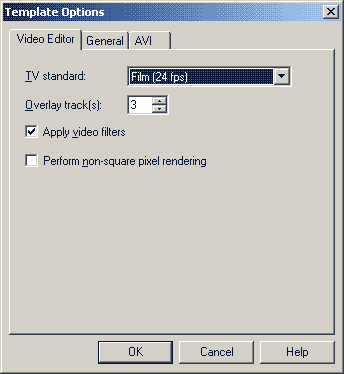 'Video
Editor' Tab
'Video
Editor' Tab
TV standard This allows you to choose between NTSC non-dropframe
(30fps), NTSC dropframe (29.97fps), PAL (25fps) and Film (24fps).
NTSC non-dropframe you will not need. I can't imagine any situation
when making amvs where you will want to use a 30fps timebase. If you
are editing interlaced 29.97fps NTSC then you will want to choose the
dropframe
option. If you are editing progressive FILM footage, then
choose the
Film option and finally if you are editing PAL
footage you choose the
PAL option.
Overlay track(s): You can have between 1 and 3 tracks and
I recommend 3.
Apply video filters: Yes, you'll want this selected.
Perform non-square pixel rendering: This is an option
which you may want to choose if you want to edit entirely in TV/DVD
PAR. However, it won't matter a great deal - personally I prefer to
edit in square pixels. You should know enough about this from the
aspect ratio section to make this choice on your own.
 'General'
Tab
'General'
Tab
Data Track You can choose to edit Audio and Video or just Audio or
Video alone. The default Audio and Video is what you will want.
Frame Rate Whatever your source frame rate is it should
go here. For FILM NTSC it will be 23.976fps, for pure NTSC it will be
29.97 and for PAL it will be 25fps.
Frame Type This depends largely on whether you have
interlaced footage or not. If you have removed interlacing you will
want to select Frame-Based and if not you will need to choose the field
order that you worked out in the Analysing your DVD Footage section
(Top First is order A). If you are editing DV footage then this will be
Bottom First (Order B).
Frame Size The resolution of your footage. This could be
all sorts of things but you will want to choose the same size as your
source footage or create a user-defined size.
Display aspect ratio The DAR is much like the DAR on dvds
and this allows you to edit with things such as 16:9 DAR in mind. You
will need to select this based on your aspect ratio decisions from
earlier.
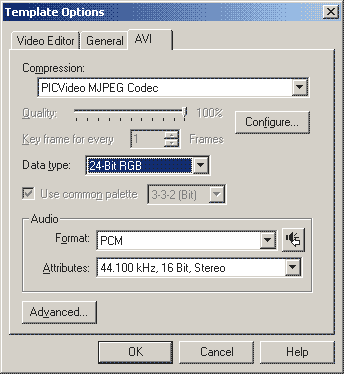 'AVI' Tab
Compression: This allows you to choose the Video For Windows codec
that will be used to compress your video. This codec will be used for
both previews and exports but luckily this can be changed at any time
(although your preview files will be lost). My advice is to set this
with a fast codec like the PICVideo MJPEG Codec (displayed here) for
editing so you get fast previews but use a Lossless codec such as
HuffYUV when you export. You can set the codec options using the
Configure
button.
Do not use divx, xvid or any similar codec
for previews - choose a codec that contains only keyframes.
Data type: Well no guesses what you can put here - 24bit
RGB is fine.
Audio: Format - This allows you to choose audio codecs
from the windows Audio Compression Manager. However, for lossless audio
you will want to select PCM.
Attributes - This will depend on your audio source but it
is probably going to be ripped from a CD and hence 44100 Hz 16bit
stereo audio. DVD audio will be 48kHz.
Advanced... There are some options here but most are not
worthy of note - except
Recompress. This option is important if
you are exporting to a different format - particularly if you want to
make sure that you get the correct colorspace exported with HuffYUV to
avoid garbage frames. It isn't needed if you are doing something like
editing DV.
Hopefully the guide so far will have given you enough insight into
video choices that you will understand how to set up your project. If
you have any questions about the setting here or have a video format
you want to edit with which is not discussed here, then ask in the
Video Software Help forum.
