Improving Visual Quality and Compressibility
for Internet Encoding
You have exported your video losslessley from your editing
package. It's been made progressive at some point along the way. Does
it still look it's best?
If the answer is "yes" then I can unequivocally say that you
are wrong.
I've yet to meet a source that I can't get to look more
appealing - and that's what it's all about isn't it?
Even some of the cleanest digital transfers can have problems.
Almost every video could do with a little cleaning. Not only that, but
what is designed to look good on TV won't always look good on a monitor
- we need to tweak.
Then finally there is the problem of compression. There are
certain filters that although they don't look like they've done much,
they have in fact made your video much easier to compress.
To improve the visual quality and compressibility of the
video, we will use a variety of filters. These come in all different
shapes and sizes but usually fall into the following categories:
Sharpening filters - These can improve the visual
quality of an image by making the edges more defined, enhancing the
details.
Smoothing filters - These can hide compression
artefacts or compensate for other sources of noise and/or colour errors.
Colour adjustment filters - These can correct issues
with the overall look of the video - the brightness, the contrast, the
saturation etc.
Exotic filters - filters designed to overcome a
particular video problem such as ghosting, moire, dot crawl etc.
Lots of programs have these sorts of filters... but frankly they all
pale in comparison to the filtering power of Avisynth and its plugins.
The AMVapp includes a LOT of the most popular plugins, and hopefully
the most up-to-date versions. All the filtering on this page can be
done with the basic AMVapp install and the commands listed here.
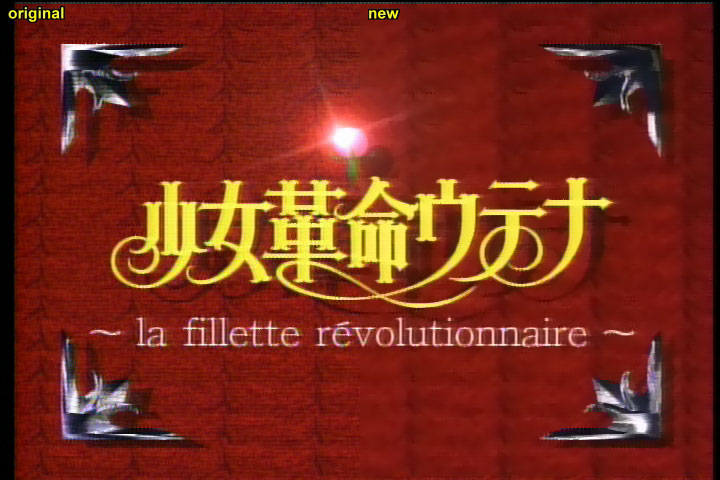
For the particular guide I am working directly from a DVD source so, if
you are interested, you can maybe try and duplicate some of these
things yourself if you have the DVD. The disc is the region 1 Utena TV
- the first DVD of the Black Rose arc "The Black Rose Blooms" released
by Central Park Media.
CPM are, in my experience, notorious for poor quality DVD prints.
Admittedly the source for Utena isn't particularly pretty anyway but it
has been exaggerated by poor analogue transfers and low
bitrates. The whole disc is squeezed into 6 Gb - leaving at least
another 3 Gb blank... wasting space which could easily be used to make
the video footage look better.
To decode the footage, I made a d2v project file in DGindex and made an
avs script that reads:
mpeg2source("J:\Black Rose
Blooms\VIDEO_TS\utena_blackroseblooms.d2v")
Telecide(order=1,post=2,blend=false,vthresh=30,back=1)
Decimate(cycle=5,mode=3,quality=3)
I then went to frame 27188 and this is what I found (apologies to dial
up users, I wanted a lossless image here to show you that all the image
problems are on the source)

Ugh. Yes my friends that is DVD footage. It's times like this when I
want to hook up my laserdisc player :)
We have pretty much every visual problem you can think of in this image
right here.
1) Macroblocking - if you look at the blue
floor you can see lots and lots of macroblocking. This is mostly caused
when a frame doesn't have enough bits to encode an area so it has to do
more rigorous averaging. This averaging can sometimes round differently
from block to block, causing this effect.
2) Mosquito noise - if you look to the top of Utena's
head at her hairline you will see that towards the edge you get a
peppered effect that we call mosquito noise. In fact most of the edges
on the whole image suffer from this problem.
3) Film noise - It is actually film noise that can cause
a lot of problems 1 and 2. Film noise you find in blocks of colour and
they show up in the form of minor fluctuations - almost like dust. This
can actually have an appealing effect sometimes but does make a source
harder to compress.
4) Rainbowing - There's not really that much on this
image (if you want to see a lot of rainbows, look at Alien 9 - also by
Central Park Media) but there are traces of yellow bordering the edges
of Utena's sword hand shirt cuff. Not enough to be too annoying but
another problem that in a sharper source would be really obvious.
5) Dot crawl - this is really hard to see, especially as
it's a "moving" noise effect that changes with frames. However, other
scenes with red show a marching ants effect in the red areas,
particularly near black borders.
6) Faded colours - CPM are actually much better with the
newer volumes of Utena. The first two dvds are more washed out looking
than this. However, the colours could do with a little tweaking - as
you'll see more clearly later on.
7) Blurry outlines - The image is very very soft, partly
due to the transfer and partly due to the old school techniques being
used. Even so, it's too soft so to look its best the edges could so
with being sharpened.
Luckily we can fix all of these things and do much more besides.
Load up your avs file into VirtualDubMod and press Ctrl+E to
bring up the avs script editor. As described earlier, this will enable
you to change the settings on your script and then press F5 to
update the image to see the effect.
The result of DVD Post-Processing
I mentioned this before but I figure I'll mention it again. One
particularly nice way of reducing noise problems
1 and 2 is by using the post processing options in the MPEG2Source
command when importing your dvd footage to avisynth. It may be too late
for many of you reading this, although I did mention it earlier too :)
Using this command:
mpeg2source("J:\Black Rose
Blooms\VIDEO_TS\utena_blackroseblooms.d2v",ipp=true,cpu=4)
The above frame came out looking like this.
Already you can see how the blocking in many areas has been reduced. In
fact, because this dvd has so many of these problems, you can go up to
cpu=6 and not worry too much about losing details as there aren't any
to lose.
25002
51604
Before the filtering: Getting the right colourspace.
As it is likely that you are working on a lossless encode of your
video, it is equally likely that this is in RGB. All the codecs that
you could use for compression for the internet will encode YV12
footage. Luckily most the filters used in this guide use YV12
colourspace too. So, you should make sure you have the correct
colourspace for your processing.
AVISource("youramv.avi")
ConvertToYV12()
If you deinterlaced, it is likely that you have already done this
conversion. If you used a YUY2 or RGB deinterlacer you should add ConvertToYV12()
after that deinterlacer command.
Getting rid of Macroblocking, Mosquito Noise and Film Noise.
Spatial and Temporal Smoothing
If you want to smooth an image, there are basically two ways
to approach the idea. The first one is the most obvious - spatial
smoothing. Spatial smoothing is where you take one frame at
a time and try to smooth out any problems in each individual frame. Temporal
smoothing, however, is very different. Temporal smoothing
looks at a pixel or group of pixels and compares to the same
pixel/group in the frames before and after this one. By doing so, a
temporal smoother looks for changes in these pixels. If an image isn't
moving but there are very small changes in the pixels then this can be
detected as noise and smoothed out.
Both of these have a visual impact on your footage but spatial
smoothing is often the most visible. Temporal smoothing, however, is
type that improves compressibility the most as distribution codecs all
only encode the differences in the frames - so by reducing the
differences by smoothing across frames you get more encoding bits to
spend on the details in the image. Temporal smoothing is always
recommended when doing internet distributions.
In your encode, you will probably be doing both spatial and
temporal smoothing. There are many theories about whether you should
smooth temporally first or spatially... no-one really knows for certain
although I prefer to smooth spatialy first.
Smoothers
The previous guide had a whole big list of spatial smoothers
with different pros and cons and it is true that there are more filters
out there to try and remove video noise than anything else.
SmartSmoothHiQ -
A very good filter that can be hard to configure to get good results.
Often better on live action than anime. Worth a try on difficult
sources though.
_2DCleanYUY2 - Brute force
cleaning at the cost of finer details. Generally shouldn't be used on
clean sources. Works in YUY2 colourspace only, which is a further
downfall.
MipSmooth - highly
sophisticated but despite the complications of configuration it dose
not yield superior results most of the time, unfortunately.
msmooth - excellent idea
where the edges of the image are masked to stop them from being
smoothed. The smoothing itself isn't the best ever, however, and this
filter can often leave your source with a slightly yellowish tint if
working in YV12. If it wasn't for this colour issue it would be
featured heavily in this guide. Otherwise a very excellent filter. If
you are doing post processing from an RGB avi file it's worth using in
RGB mode as that avoids the colour problems.
vaguedenoiser -
interesting filter that turns blocky noise into.. noise which is more
vague looking. A genuinely nice approach that doesn't hurt details too
much but isn't massively strong either. Good if you want to avoid that
washed out look that many smoothers can give. It's also the kind of
filtering that really helps compression, often moreso than deen - so
it's worth looking into for that.
Convolution3D-
this filter works both spatially and temporally at the same time (hence
3d) and offers very good compressibility increases when used. This has
been since superceeded by deen.
Deen - 6 filters in one. Can operate in 2d or 3d space
with a variety of filtering types. One of the most impressive
all-rounders you will find and the filter that we will use for
smoothing in this guide.
Although I am only going to focus on deen, all of the above filters
have something to offer. Post processing is very much dependant
on your source and no set of options will work universally. There are
many filters I use time and again but I frequently have to tweak
settings in order to find the optimum configuration. If you want your
video to look good, you should spend this extra amount of time post
processing it right.
Configuring Deen
Deen, in terms of output, is actually very similar to msmooth except
that it does not suffer from the tint issue. Although
its edge detection isn't nearly as customisable, it is naturally very
protective of edges - much more so than old school filters like 2D
Cleaner. For this reason it can be used for both brute force and more
subtle smoothing with good results.
Deen is actually a collection of
different types of
smoothers which you can select. A typical deen function looks like this:
deen("a3d",4)
Here, "a3d" is the filter type - let me
explain what the different
filter types are.
"c2d" - basic 2d
smoothing.
"c3d" - convolution 3d... smooths both within the frame
and from frame to frame.
"a2d" - smoothing optimised for areas of colour like in
anime.
"a3d" - same as a2d but also smooths from frame to frame.
"w2d" - smoothing weighted by distance in order to
retain gradients.
"w3d" - like w2d but also smooths from frame to frame.
The number that comes after the filter type
is the area that is to be
smoothed. With the "2d" filters this are can go from 1 to 7 (with 7
being a 15x15 area) and when using the 3d filters this value can go as
high as 4 (9x9).
The strength of the filter is also configurable like this:
deen("a3d",4,10,12)
Here 10 represents the luma threshold,
increasing it will
increase the amount of smoothing on the luma part of the image. 12 represents
the chroma threshold. What you will want
to do is try out
some of these thresholds until you get a result you like. The defaults
are 7 for luma and 9 for chroma. Generally you can smooth chroma more
than you can luma without damaging details. The defaults are good for
starters but every source is different and you should tweak the
settings to find out what is best for your source.
Also, be sure to read the documentation
on any filters you
want to try out. They are all available in the start menu > AMVapp
> AVS Filters > Documentation.
Anyway, back to Utena you can see how we are doing on that
nasty frame 27188. Better, certainly, but we aren't finished with this
image quite yet:

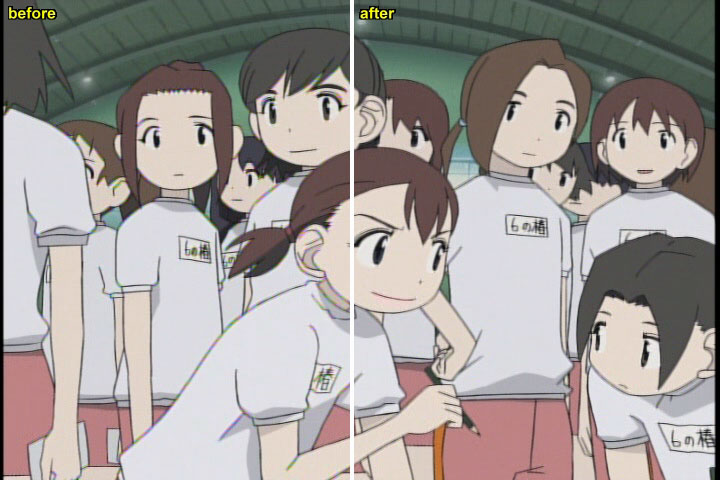
Losing too many details
One of the main problem with smoothers is
when you have detail that, to
the smoother, looks just like noise. Here's a split screen of a before
and after shot:
When you have a pattern
like this, it can be a
tough call when distinguishing between noise and details. In a sense
the noise here is the detail as the texture of the background
is very similar to regular mpeg noise (and I'm sure it is made out of a
lot of mpeg artefacts too). However, this can be avoided by either
reducing the radius of the filter or by reducing the noise detection
threshold. Having those things set too high can give you the blurry
sponge wash effect you see here.
Each source is different so you need to find a happy balance between
the getting rid of noise and keeping details. Ideally, what you need to
do is find yourself two or three frames of different types - one with
lots of detail like this one, another with not so much detail but
obvious mpeg noise and maybe a third for good measure (a high motion
frame for example). Compare your settings in the different frames. Make
a note of the frame numbers and use Ctrl+G to switch from
frame to frame. Adjust your options and see which set of options either
works well for all the frames or works best for the most common type of
frame in your source.
Colour Banding
If you overblend a source, often what
will happen is that
instead of having a fine gradient in an area, it will look like it has
bands of changing colours instead of one steady progressive change of
colour. This can happen a lot around things like light sources in
anime. There are several different ways to eliminate this problem. If
you are using msmooth then you need to be more careful that your mask
isn't selecting areas within the gradients. If you are using deen in
one of the "a" modes, then you might want to try one of the "w" modes
as this is designed to help against oversmoothing gradients.
Temporal Smoothing
Temporal smoothing mainly reduces film
noise. Whilst this is
sometimes the least visible noise in a source it can often be the most
destructive in terms of compression as each small fluctuation in noise
has to be encoded.
Temporal Smoothing works by detecting if
a pixel is changing
because it needs to change or because there is some noise. If noise is
detected then the pixels are either averaged out in time or the first
pixel is copied to the subsequent frames. It has various ways of
detecting whether it's noise or not, of course, but the result is that
it can drastically reduce noise and even more drastically make the
video more compressible as it is these subtle changes that we end up
compressing.
As you may have noticed already, Deen has
some 3d options which can be
used to do both spatial and temporal smoothing at once. These are the "c3d"
"a3d" and "w3d" settings.
They are very good at reducing temporal noise and can sometimes be more
effective than separate spatial and temporal filters. However, the
spatial smoothing in these 3d versions are not always as good as the 2d
equivalents. If you find that "a3d" or "w3d" work well for you then you
can use this as an all-round spatial and temporal smoother.
If, however, you prefer the large ranged smoothing of "a2d" or "w2d"
then you may want to use a standalone temporal smoother. For this job
there are two filters I recommend: fluxsmooth and temporalcleaner.
fluxsmooth - This filter has a spatial component but the
spatial component is there to find out what a pixel should be averaged
to. This is a very powerful filter and definitely a good addition to
almost any filter chain. The default settings are fluxsmooth(7,7)
where the
first 7 is the temporal threshold and the last 7 is the spatial
threshold. Increasing these values can improve the smoothing but this
filter needs very little tweaking.
temporalcleaner - this is a classic, simple but effective temporal
cleaner. This filter is very reliable and can be used at its default
settings. Simply add temporalcleaner() to your script.
Removing Rainbows
Rainbows are one of the worst kinds of video problems you can
find on an anime source. They are caused by bad analogue transfers of
video data where the chroma leaks outside sharp fine edges. The result
is a mostly yellow but often purple and all sorts of other colours in
this rainbowing effect.
Usually this sort of visual problem is avoided by modern dvd
transfer techniques but it is a problem that was prevalent on many
bandai dvds (Trigun and Escaflowne being popular examples) and it is
still a problem with modern Central Park Media releases.
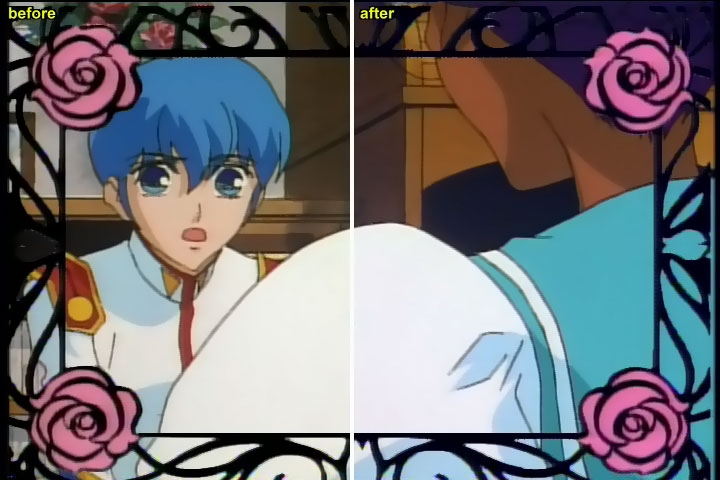
Here is an example scene from CPM's region 1 release of Alien
9.
The left hand side shows a great amount of rainbowing on the sharper
elements of the image: the shirts, eyes, ears, writing etc. The right
hand side has been processed to eliminate that a little:
Most of the rainbows have been removed here, but there are
some side effects including the pinkness around the girl's mouth.
The script used for the rainbow removal is simply mfrainbow().
It is one of several functions that can be used to tackle rainbow
artefacts. As the nature of these rainbows can be a little
unpredictable it's best to find a frame with lots of them and try
these commands out one by one to see what looks best.
mfrainbow(strength=255) - the strength
is set to maximum by default
SDDeRainbow() - A
script written by sh0dan on doom9 that I have included in the AMVapp.
Bifrost(interlaced=false)
- Yatta creators attempt at derainbowing.
Bifrost(scenelumathresh=2,altclip=SSIQ(11,300,false),interlaced=false)
- a more aggressive and powerful usage of the Bifrost filter.
One of the above commands should be able to at least help
reduce the rainbows if not remove them altogether. One thing to watch
out for, however, is if the filters adversely affect the colour of your
image. All of these commands filter the chroma channels so sometimes
odd effects may happen so be on the lookout for those if you use these
functions.
Note: To create an image comparison like the one used above,
there is a helper script written by Corran and me called beforeafter.
You can use the script like this:
BeforeAfter(1,filters="""fluxsmooth().mfrainbow()""")
Change the number 1 to 0 for a horizontal split and change the
list of filters to whatever you want to process the image. The triple
quote marks are there in order to also support filters that contain
strings in their arguments like deen("a3d",4). To show a white line across the sections
like the image
above, use BeforeAfterLine instead
of BeforeAfter.
Sharpening the Image
Many of you will know that when you compress something, the sharper it
is the more detailed it is and the more detailed it is the harder it is
to compress. Thanks to this principle, sharpening is often considered
the killer of compressibility.
Well it is. However, I'm going to forget about that and instead show
you how incredible you can get your video to look with some sharpening
filters. See, as we are doing all this smoothing which is helping out
out compressibility we probably expend a little amount of our bitrate
in getting the video looking really sharp.
There are a lot of traditional sharpening filters that have been around
for a long time and anyone who is a frequent Photoshop user will be
familiar with things like Unsharp Mask. Well, we are going to use a few
different approaches to sharpening - ones that look only for the edges
and sharpen those.
msharpen - the sharpening counterpart to msmooth and a
very excellent little filter. This is what you want to use for a basic
sharpener when you don't want a lot but just a little. The filters that
will be described later are much more brute force about sharpening and
edge enhancement and you should generally skip using msharpen if you
are going to use them. However, if you just want a simple, gentle
sharpener then msharpen is a very good filter. Here's how to use it:
msharpen(threshold=8,strength=100,mask=true)
This will enable msharpen in tweak mode, showing us the mask it is
going to use to only identify the edges. You will get an image that
looks something like this:
By adjusting the threshold value you can change the mask to select only
the areas of the image you want sharpening. The mask here is about
right but sometimes the blue areas you can see here are less desirable
for sharpening so you may want to tweak those out. With some tweaking
and using msharpen(threshold=10,strength=80,mask=true,highq=true) I was able to get
a sharpening effect like this:
Only a gentle sharpening really, but you can see much more clarity on
the eyelashes and necklines thanks to this filter.
However, this is only the beginning. If you want your video to really
stand out with stunning lines then you are going to want to skip
msharpen and jump straight to mftoon.
mfToon - the god of anime sharpening
mfToon is nothing short of insanity. It's an avisynth script
function that detects edges, darkens them, sharpens them and then
overlays them back onto the image. The results are pretty stunning as
you will see here:
Much better. The eyelines are dark, the hair is well defined and
wonderfully clear. The other great thing about mftoon is that it's
really easy to use too:
mftoon()
That's it. 9 times out of 10 you will not need to change the default
parameters of mftoon. However, it can sometimes be a little on the
strong side. To lessen the strength use mftoon(strength=128) - the default strength is the maximum of 255 so 128 is
half strength.
Note that when using mftoon your video processing
will grind to a veritable halt as it's a very slow filter. So, if you
are going to be encoding the
video more than once (likely) then you are better off making a lossless
copy of the filtered video and then compressing that. I'll show you how
to do that later.
Another problem with using sharpening filters as powerful as mftoon is
that they will also work on things like your titles, effects and other
graphical elements. This is the reason why pre-filtering is better than
post filtering as you can apply mftoon before you do your effects or
your titles. However, even so it's not all that bad using it on titles
and effects. If you have a section of your video that you think is
being harmed by mftoon, you can always trim that section out and
selectively filter the video. I'll show you how to do that later.
FastLineDarken
FastLineDarken isn't a sharpener at all, it is simply a filter to
darken the lines on your anime. mftoon does this but it also does
sharpening and a whole bunch of other stuff which may not to your
liking. FastLineDarken simply darkens the lines and is a bajillion
times faster than mftoon. It's a wonderfully simple tool that I cannot
recommend highly enough.
One thing you will note is that when a line is darkened it can
sometimes look fatter than it did before, simply because the line area
is more visible. You can reduce this effect with awarpsharp (which
is what mftoon also tries to do)
SSXSharpen
Finally, the last of the sharpeners I would like to mention is SSXSharpen.
This is a sharpening function that uses supersampling - i.e. it scaled
the image up before processing. It's a wonderful sharpener and if you
are feeling really daring with your sharpening then you can run this
after mftoon to improve the image even more.
The default command SSXSharpen()
is fine but you can add a
number in the brackets to specify the scale of the supersampling using
ssw and ssh (for width and height respectively). The
default values are 4, so you can lower this to two or even increase it
to
something silly like 8. You can also change the strength and threshold
of the sharpening by defining xstren and xthresh.
The defaults for the
whole function are SSXSharpen(ssw=4,ssh=4,xstren=255,xthresh=255)
Play around and see what suits you best. Again,
this filter is slow... and bluky. A seemingly faster version of this
filter is the following command:
LimitedSharpen(ss_x=2.0,
ss_y=2.0, Smode=2)
Colour Correction
Now, one might be forgiven for looking at
that mftooned image and thinking "the colours look pretty good to me".
Well... they're almost right, but not quite.
Many anime sources have colour and brightness settings that people just
plain take for granted. The reality is often that, on a monitor at
least, they are often undersaturated, dull and low contrast. Luckily
for us, there is a great avisynth filter to change these things for us
called Tweak.
Tweak(cont=1.0,sat=1.0,bright=0, hue=0)
The settings here will not change the image
at all, they are the settings where everything stays the same.
Cont means contrast and
1.0 means it is at the regular setting. Change that to 2.0 and the
contrast is doubled. Likewise sat means saturation (colourness)
and the same scale applies. Reduce this to zero and you will get a
greyscale image.
Bright means brightness.
This value alters the value of each luma channels up or down. This can
go to plus or minus 255 with +255 being pure white and -255 being pure
black. Hue cycles the colour values on the chroma channel. This
can be + or - 180 but is not the kind of effect we generally want to
use to improve our image as it is unlikely that the colours will be
offset by a universal value that can be fixed by cycling the hue.
So, if we wanted to increase the saturation of our image, we would use
something like:
Tweak(sat=1.2)
This boosts all the chroma channels by 20%.
Let me show you the effect some of these settings have on our utena
source:
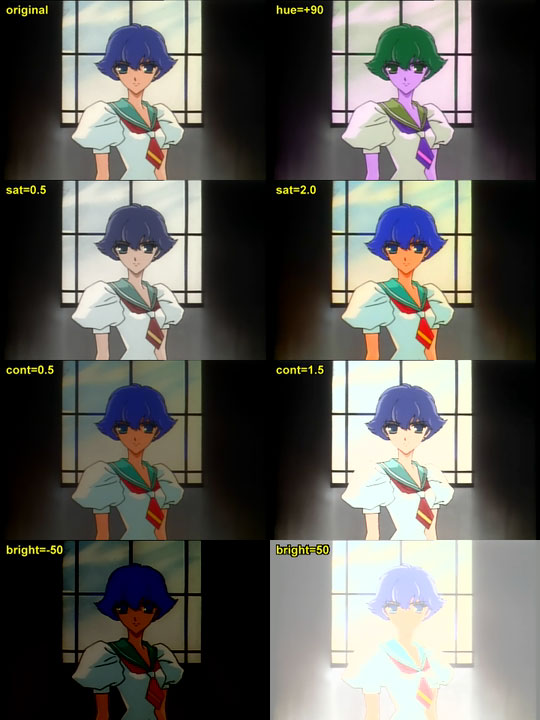 The effects of each of the settings
are all pretty much what we'd expect.
Of course, I've set really extreme values here so you can see what
effect each option has.
The saturation has made all the colours louder or more washed out, the
contrast either increases the difference between the light and the dark
or reduces it and finally the brightness either adds or subtracts from
the luma value of each pixel.
Self explanatory mostly, however there is one ulterior motive in
showing these images and that is to note something which is wrong with
the source.
The saturation at 2.0 has doubled all the chroma values and we can see
that this has made all the colours vibrant... including the clouds and
the uniform. Now, forgive me if I'm wrong but aren't both of these
things supposed to be white?
There's the rub. When I said earlier that you'd probably think that the
utena image was fine in terms of colour and I said it's not quite
correct, this is what I meant.
The utena footage (on this dvd at least) seems to have a very slight
yellow tint on everything and this is noticeable on things that are
supposed to be white. Now, those of you who can remember the talk about
colourspaces and chroma may recall that chroma channels can have a
positive or a negative value. Positive V is red and negative V is
green... and likewise positive U is blue and negative U is yellow.
This footage has slightly incorrect U chroma.
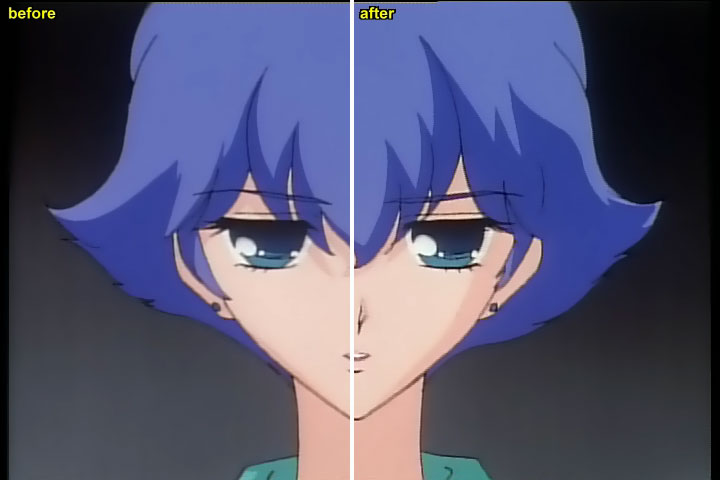
To fix this, we can use a function called ColorYUV. This has a lot of
settings and is generally for advanced users only but it is useful to
show you the difference simple colour changes like this can make to a
source.
By applying ColorYUV(gain_u=15) we multiply the u chroma channel by 5%
(256 is a 100% increase) which compensates for the small amount of
yellow in the image. This is the result:
See, even Miki was surprised by the difference.
One of the things about colour correction is that you often take an
image for granted. You get used to it and you don't question it. It
usually takes a really big difference like the red tint in the Japanese
release of Spirited Away for people to notice. However, a small change
like this can really make your footage stand out. These whites are good
enough to be in a Tide commercial.
I'm not expecting all sources to have this particular problem, though.
Most sources simply have saturation and contrast levels that are
lowered for TV outputs so you will want to tweak these.
Put them all together
So you've seen smoothing, rainbow removal, extreme sharpening and
colour correction. By using all of these things together you will see a
HUGE difference between the source you had at the start and the one you
have now.
You should have an avisynth script with a filter chain something like
this:
AVISource - importing your amv
ConvertToYV12() for filter compatibility if you have an rgb or YUY2
source
IVTC or Deinterlacer
Smoother (Deen, msmooth or similar)
Temporal Smoother (fluxsmooth, temporalcleaner etc)
Sharpener (msharpen, mftoon, ssxharpen etc)
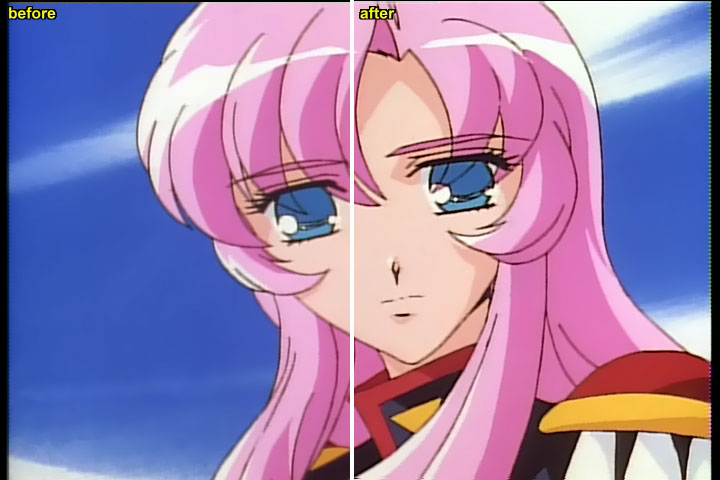
Let's take another look at that nasty frame 27188 with all
the corrections in place:
Now, with a little javascript wizardry you can hover your mouse
over this image to compare it to the original. You may have to wait
for the secondary image to load:
Looks It's not a bad correction, given the
dreadful original frame but this heavy filtering may not be good on the
anime as a whole, so you need to find a balance.
You can see how some of the other scenes turned
out on this page.
By now you should have a pretty nice looking video... you just need to
crop and resize.
AbsoluteDestiny
- June 2004
|
