Using DVDs for audioIt is possible that you might want to extract audio from a DVD
- say a song from a musical or the audio track from a movie trailer.
What you will need to do is extract the audio and convert it to WAV for
editing. Right, for this you will either need the AMVapp
or the following programs. DVDDecrypter
(or any DVD ripping program but this is my fave) Ripping the Audio from the DVD If you have no experience with DVD ripping the you should
probably go and read the dvd ripping part of the guide here. One thing I will note
is that you
will probably only want to extract one chapter. My favourite dvd
ripping tool for this sort of thing is DVDDecrypter but any will do. What you might want to do is rip only the chapter of the dvd
that contains the audio that you want. This will save you some
unnecessary audio editing later. Once you have ripped the vob that contains your audio, you
need to load it into DGIndex. Extracting the audio from the VOB file In the menu, choose the Audio ->Track Number that you want to extract. Then go into Audio -> and choose Demux (AC3, MPA, DTS)The keen-eyed will notice that there is an option to Decode to WAV. While a useful quick method for decoding AC3 audio to WAV it is not as accurate as BeSweet so we will not be using this method.
Press F5 and you will get a bunch of information that
looks a little something like this:
DD means Dolby Digital - if you have dolby
digital audio you will have two groups of numbers after the DD. The 2/0
here means 2 front audio channels and 0 rear audio channels
(i.e. stereo sound). 5.1 sound would be listed as 3/2.
The last number here (192) is the bitrate of the audio,
just like you have with mp3s. Higher is better quality, naturally. If the format reads DTS then that should be self-explanatory. DTS audio is very good quality but in order to convert it using BeSweet you need DTSSource.ax (By Gabest) and InterVideo WinDVD Platinum. Due to the need for a commercial program I did not include DTS support in the amvapp. MPEG Audio would mean that the file has mpeg2 audio
but this is unlikely for a commercial DVD. Last but not least is PCM which is uncompressed wav audio. If
your DVD has this then you are in luck because you will not need to do
any further converting - simply change the Audio Output setting to Decode
to Wav. Few movies use uncompressed audio as it limits the video
bitrate but it is common on music video dvds. Once you have the audio stream you need, choose the File menu
and Save Project and you will create both a
project file (.d2v) and a demuxed copy of your audio (.ac3, .dts or
.wav). It is likely that the filename will contain some information
about the amount of channels and the audio delay. The audio delay you
would need to know if you were syncing this audio with video decoded
from the DVD but otherwise you don't need to know.
BeSweet should look a little something like this: 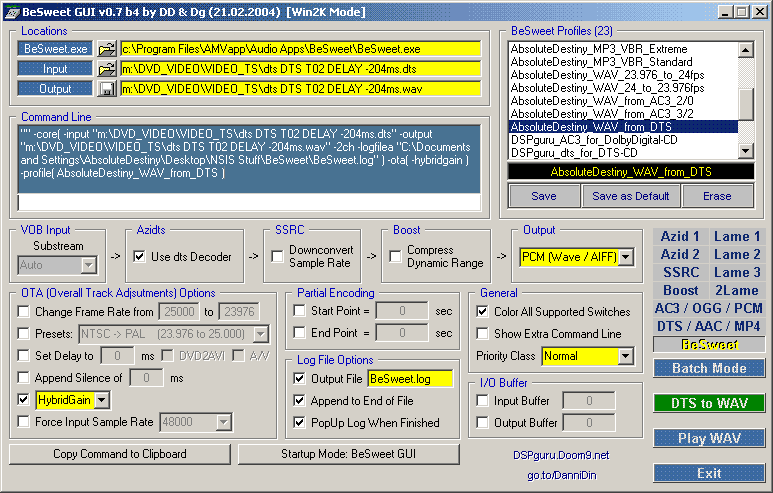 Use the Folder icon next to Input (in the Locations section, top left) to bring up a navigator where you can locate your audio. Note that in order to see your audio you need to choose the correct prefix (.ac3, .dts etc) and when selecting the file make sure you double-click to choose it. The Output file will be added automatically but you can change the name and location if you want. Once you have your demuxed audio selected all you have to do is choose one of the following profiles: These profiles will select all the settings you will need to do the conversion. Simply choose the option that fits your audio type. Once you have chosen the profile (the command line should look much like it does above), make sure the output says PCM (Wave / AIFF). The final consideration you may want to make is the samplerate. By default, DVDs have a 48khz samplerate on the audio, whereas CDs have 44.1khz. If you are going to mix sources you might want to select SSRC: Downconvert Sample Rate at this point to output as 44.1khz like CDs. The reason to downsample here is because SSRC is the most accurate sample rate converter around. You are now ready to output the audio. To make your wav file, click the GREEN button that says AC3 to WAV or DTS to WAV (depending on your source audio). When you do this, a DOS-style window will appear that looks something like this: 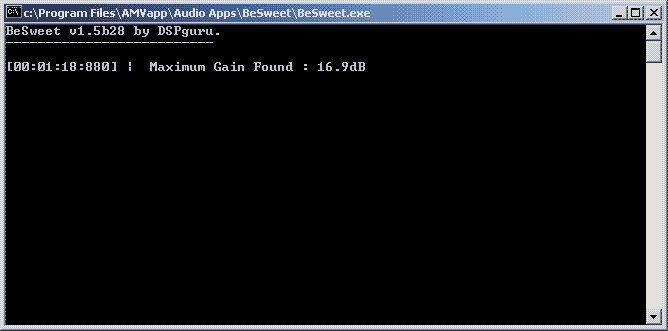 In the image here the text Maximum Gain Found refers to how many decibels the audio is going to be boosted in order to reach optimal volume (Normalised). This is required because DVD audio is often encoded very quietly in comparison to CDs for example. Once the processing has completed you should have a wav audio file ready to be edited with. AbsoluteDestiny - August 2004 |
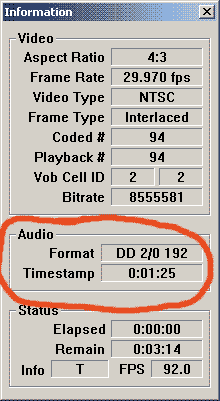 The
Audio: Format information may require some explanation. In this
image we have the format listed as DD 2/0 192.
The
Audio: Format information may require some explanation. In this
image we have the format listed as DD 2/0 192.